USB 使用指南
1. 配置指南
ArtinChip 提供了 2 路 USB Host 端口 和 1 路 USB Device 端口,需要分别进行配置。
1.1. USB Host 配置
1.1.1. USB Host Controller 配置
首先需要配置好 USB Host Contoller ,ArtinChip 在 1 个 USB Host 端口中提供了 2 类 Host Contoller:
- 针对 USB 2.0 (High Speed) 的 EHCI 控制器
- 针对 USB 1.0/1.1 (Low/Full Speed) 的 OHCI 控制器
在软件上需要需要分开配置。
1.1.1.1. EHCI 配置
- Linux Kernel Kconfig 文件中使能相应 EHCI Driver:
> Device Drivers > USB support

 <*>   EHCI HCD (USB 2.0) support
 [*]     Root Hub Transaction Translators
 [*]     Improved Transaction Translator scheduling
 <*>     Support for Artinchip on-chip EHCI USB controller
注解
内核配置主要是通过 make menuconfig 命令进行kernel的功能选择,配置完成后的项目存储在 target/configs/xxx_defconfig 文件中。
- DTS 文件中配置相应 EHCI Device:
usbh0: usb@10210000 {
    compatible = "artinchip,aic-usbh-v1.0";
    reg = <0x0 0x10210000 0x0 0x100>;
    interrupts-extended = <&plic0 35 IRQ_TYPE_LEVEL_HIGH>, <&plic0 4 IRQ_TYPE_LEVEL_HIGH>;
    clocks = <&cmu CLK_USBH0>;
    clock-names = "usbh";
    resets = <&rst RESET_USBH0>;
    reset-names = "usbh";
    dr_mode = "host";
};

usbh1: usb@10220000 {
    compatible = "artinchip,aic-usbh-v1.0";
    reg = <0x0 0x10220000 0x0 0x100>;
    interrupts-extended = <&plic0 37 IRQ_TYPE_LEVEL_HIGH>,
                        <&plic0 38 IRQ_TYPE_LEVEL_HIGH>;
    clocks = <&cmu CLK_USBH1>;
    clock-names = "usbh";
    resets = <&rst RESET_USBH1>, <&rst RESET_USBPHY1>;
    reset-names = "usbh", "usbh-phy";
    dr_mode = "host";
};
注解
这些参数主要在文件 target/d211/common/d211.dtsi 中,模块系统参数随 IC 的设定而定,一般不能进行更改,除非更换了新的 IC,则需要在专业人士的指导下进行更改。
1.1.1.2. OHCI 配置
- Linux Kernel Kconfig 文件中使能相应 EHCI Driver:
> Device Drivers > USB support

 <*>   OHCI HCD (USB 1.1) support
 <*>     Support for Artinchip on-chip OHCI USB controller
- DTS 文件中配置相应 EHCI Device:
ohci0: usb@10210400 {
    compatible = "artinchip,aic-ohci-v1.0";
    reg = <0x10210400 0x100>;
    interrupts = <&plic0 4 IRQ_TYPE_LEVEL_HIGH>;
    num-ports = <1>;
};

ohci1: usb@10220400 {
    compatible = "artinchip,aic-ohci-v1.0";
    reg = <0x10220400 0x100>;
    interrupts = <&plic0 6 IRQ_TYPE_LEVEL_HIGH>;
};
1.1.2. USB Interface 驱动配置
在配置好 USB Host Controller 以后,就能够正确识别插入 USB 总线的 Device 设备了。
但是 USB Device 有很多不同类型 (例如:U 盘、键盘鼠标、无线网卡 …) ,这些功能都是在 USB Device 中以 Interface 为单位提供的。所以要使用 USB Device 的具体功能,还需要配置不同类型 USB Interface 的驱动。
1.1.2.1. U 盘 配置
- U 盘是 USB 2.0 设备,所以首先得配置好上节中的 EHCI,再进行下面的配置。
- 在 Linux Kernel Kconfig 中使能对 USB Mass Storage 类型的 USB Interface 驱动的支持。
> Device Drivers > USB support

 <*>   USB Mass Storage support
- 还需要使能其他相关配置:
块设备:
> Device Drivers

 [*] Block devices  --->
SCSI 设备:
> Device Drivers > SCSI device support

 <*> SCSI device support
 [*] legacy /proc/scsi/ support
     *** SCSI support type (disk, tape, CD-ROM) ***
 <*> SCSI disk support
文件系统:
> File systems > DOS/FAT/EXFAT/NT Filesystems

 <*> VFAT (Windows-95) fs support
- 插入 U 盘,通过
mount命令将 U 盘挂载到合适的目录下就可以操作了:
[aic@] #
[ 1591.469696] usb 1-1: new high-speed USB device number 3 using aic-ehci
[ 1591.674435] usb-storage 1-1:1.0: USB Mass Storage device detected
[ 1591.682567] scsi host0: usb-storage 1-1:1.0
[ 1592.692021] scsi 0:0:0:0: Direct-Access     SanDisk  Cruzer Blade     1.00 PQ: 0 ANSI: 6
[ 1592.714329] sd 0:0:0:0: [sda] 30842880 512-byte logical blocks: (15.8 GB/14.7 GiB)
[ 1592.724171] sd 0:0:0:0: [sda] Write Protect is off
[ 1592.730166] sd 0:0:0:0: [sda] Write cache: disabled, read cache: enabled, doesn't support DPO or FUA
[ 1592.751720]  sda: sda1
[ 1592.768330] sd 0:0:0:0: [sda] Attached SCSI removable disk

[aic@] # mount -t vfat /dev/sda1 /mnt/u
[aic@] # ls /mnt/u
System Volume Information  u-boot-spl-dtb.bin
u-boot-dtb.bin             vmlinux
u-boot-dtb.img             zImage
u-boot-spl-dtb.aic
[aic@] #
1.1.2.2. USB 键盘/鼠标 配置
- U 盘是 USB 1.0/1.1 设备,所以首先得配置好上节中的 OHCI,再进行下面的配置。
- 在 Linux Kernel Kconfig 中使能对 USB HID 类型的 USB Interface 驱动的支持。
> Device Drivers > HID support > USB HID support

 <*> USB HID transport layer
- 插入键盘鼠标,可以通过
/dev/input/event文件读取到键盘鼠标上报的数据:
[aic@] #
[   14.210983] usb 2-1: new low-speed USB device number 2 using aic-ohci
[   14.478006] random: fast init done
[   14.497013] input: PixArt Dell MS116 USB Optical Mouse as /devices/platform/soc/10220400.usb/usb2/2-1/2-1:1.0/0003:413C:301A.0001/input/input2
[   14.510871] hid-generic 0003:413C:301A.0001: input: USB HID v1.11 Mouse [PixArt Dell MS116 USB Optical Mouse] on usb-10220400.usb-1/input0

[aic@] # hexdump /dev/input/event2
0000000 e138 5e0b 4c30 0004 0004 0004 0001 0009
0000010 e138 5e0b 4c30 0004 0001 0110 0001 0000
0000020 e138 5e0b 4c30 0004 0000 0000 0000 0000
0000030 e138 5e0b d657 0007 0004 0004 0001 0009
0000040 e138 5e0b d657 0007 0001 0110 0000 0000
0000050 e138 5e0b d657 0007 0000 0000 0000 0000
0000060 e139 5e0b 9085 0003 0004 0004 0001 0009
0000070 e139 5e0b 9085 0003 0001 0110 0001 0000
0000080 e139 5e0b 9085 0003 0000 0000 0000 0000
0000090 e139 5e0b a3bc 0005 0004 0004 0001 0009
00000a0 e139 5e0b a3bc 0005 0001 0110 0000 0000
00000b0 e139 5e0b a3bc 0005 0000 0000 0000 0000
1.2. USB Device 配置
首先要配置好 USB Device Controller。
1.2.1. USB Device Controller 配置
- Linux Kernel Kconfig 文件中使能相应 UDC Driver:
> Device Drivers > USB support > USB Gadget Support > USB Peripheral Controller

 <*> ArtinChip USB2.0 Device Controller
- DTS 文件中配置相应 UDC Device:
aicudc: udc@10200000 {
    compatible = "artinchip,aic-udc-v1.0";
    reg = <0x0 0x10200000 0x0 0x1000>;
    interrupts-extended = <&plic0 34 IRQ_TYPE_LEVEL_HIGH>;
    clocks = <&cmu CLK_USBD>, <&cmu CLK_USB_PHY0>;
    clock-names = "udc_clk";
    resets = <&rst RESET_USBD>, <&rst RESET_USBPHY0>;
    reset-names = "aicudc", "aicudc-ecc";
    status = "okay";
};
1.2.2. USB Gadget 配置
为了方便 Linux 系统模拟成各种类型的 USB Device,Linux 设计了一个 Gadget Device 。为了方便用户使用 ,Linux 又将 ConfigFS 引入 USB Device 子系统,用来灵活配置 Gadget Device。
所以在使用 USB Device 时,在 Linux Kernel 中把这两者都配置成使能。
1.2.2.1. Gadget 配置
> Device Drivers > USB support

 <*>   USB Gadget Support  --->
1.2.2.2. ConfigFS 配置
> Device Drivers > USB support > USB Gadget Support

 <*>   USB Gadget functions configurable through configfs
1.2.3. USB Interface 配置
在 Gadget Device 基础之上,需要配置具体的 Interface / Function 才能提供具体的 USB Device 功能。
USB Gadget Device 可以模拟成各种功能的 USB 外设,例如:USB 串口、USB 网口、U 盘。。。
1.2.3.1. ACM 串口 配置
- Linux Kernel Kconfig 文件中使能
CDC ACM类型的Gadget functions:
> Device Drivers > USB support > USB Gadget Support

 <*>   USB Gadget functions configurable through configfs
 [*]     Abstract Control Model (CDC ACM)


> Device Drivers

 [*] Block devices  --->
- 通过用户态的 configfs 文件接口创建包含
ACM串口功能的 USB Device:
mount -t configfs none /sys/kernel/config
cd /sys/kernel/config/usb_gadget
mkdir g1
cd g1
echo "0x1d6b" > idVendor
echo "0x0104" > idProduct
mkdir strings/0x409
ls strings/0x409/
echo "0123456789" > strings/0x409/serialnumber
echo "AIC Inc." > strings/0x409/manufacturer
echo "Bar Gadget" > strings/0x409/product
mkdir functions/acm.GS0
mkdir configs/c.1
ls configs/c.1
mkdir configs/c.1/strings/0x409
ls configs/c.1/strings/0x409/
echo "ACM" > configs/c.1/strings/0x409/configuration
ln -s functions/acm.GS0 configs/c.1
echo `ls /sys/class/udc` > UDC
-
用户使用:
-
将单板的 USB Device 端口和 Windows PC 的 USB Host 端口连接,在 Windows PC 设备管理器会看到一个新的USB串口节点:

-
在 PC 端使用串口终端工具打开 COM12,波特率使用 115200。
-
在单板端执行:
echo abd > /dev/ttyGS0,在 PC 端串口就会收到该字符串: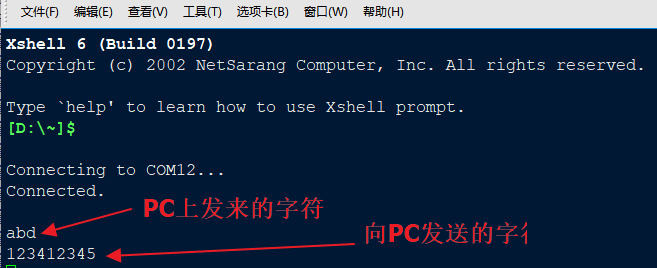
-
在单板端执行
cat /dev/ttyGS0,在 PC 端写一个字符串 “123412345” ,点回车后,在单板端也能收到该字符串。
-
1.2.3.2. U 盘 配置
- Linux Kernel Kconfig 文件中 :
使能 Mass storage 类型的 Gadget functions ::
> Device Drivers > USB support > USB Gadget Support

 <*>   USB Gadget functions configurable through configfs
 [*]     Mass storage
使能环回块设备:
> Device Drivers

 <*>   Loopback device support
- Busybox 中使能
losetup命令:
>  Linux System Utilities

 [*] losetup (5.5 kb)
- 通过用户态的 configfs 文件接口创建包含
Mass storage存储功能的 USB Device:
dd if=/dev/zero of=/tmp/mass.img bs=128K count=132
losetup /dev/loop0 /tmp/mass.img
mkdir /tmp/media
mkfs.vfat /dev/loop0
mount -t vfat /dev/loop0 /tmp/media/
cp /linuxrc /tmp/media
sync

mount -t configfs none /sys/kernel/config
cd /sys/kernel/config/usb_gadget
mkdir g_mass
cd g_mass
echo "0x200" > bcdUSB
echo "0x100" > bcdDevice
echo "0x1234" > idVendor
echo "0x5678" > idProduct
mkdir configs/c1.1
mkdir functions/mass_storage.0
echo /dev/loop0 > functions/mass_storage.0/lun.0/file
mkdir strings/0x409
echo "0123456789ABCDEF" > strings/0x409/serialnumber
echo "river" > strings/0x409/manufacturer
echo "river_msc" > strings/0x409/product
mkdir configs/c1.1/strings/0x409
echo "abc" > configs/c1.1/strings/0x409/configuration
ln -s functions/mass_storage.0 configs/c1.1
echo `ls /sys/class/udc` > UDC
-
用户使用:
- 将单板的 USB Device 端口和 Windows PC 的 USB Host 端口连接,在 Windows PC 上会看到一个新增的 U 盘,可以正常读写。
1.2.3.3. NCM 网口 配置
- Linux Kernel Kconfig 文件中 :
使能 CDC NCM 类型的 Gadget functions ::
> Device Drivers > USB support > USB Gadget Support

 <*>   USB Gadget functions configurable through configfs
 [*]     Network Control Model (CDC NCM)
使能 TCP/IP 支持:
> Networking support > Networking options

 [*] TCP/IP networking
- 通过用户态的 configfs 文件接口创建包含
CDC NCM以太网功能的 USB Device:
mount -t configfs none /sys/kernel/config
cd /sys/kernel/config/usb_gadget
mkdir g_ncm
cd g_ncm
echo "0xA55A" > idVendor
echo "0x0111" > idProduct
mkdir strings/0x409
echo "0123456789" > strings/0x409/serialnumber
echo "Xyz Inc." > strings/0x409/manufacturer
echo "NCM gadget" > strings/0x409/product
mkdir functions/ncm.usb0
mkdir configs/c.1
mkdir configs/c.1/strings/0x409
echo "NCM" > configs/c.1/strings/0x409/configuration
ln -s functions/ncm.usb0 configs/c.1
echo `ls /sys/class/udc` > UDC

ifconfig usb0 up
ifconfig usb0 173.11.1.1
-
用户使用:
-
将单板的 USB Device 端口和 Ubuntu PC 的 USB Host 端口连接,在 Ubuntu PC 会看到一个新的网络接口,名字随机,类似:
enx0afcc15d3417。 -
配置 Ubuntu PC 端的网口为同一网段地址,
sudo ifconfig enx0afcc15d3417 173.11.1.2。 -
两个网口相互可以 ping 通:
ubuntu@ubuntu $ ping 173.11.1.1
PING 173.11.1.1 (173.11.1.1) 56(84) bytes of data.
64 bytes from 173.11.1.1: icmp_seq=1 ttl=64 time=10.3 ms
64 bytes from 173.11.1.1: icmp_seq=2 ttl=64 time=5.02 ms -
1.2.3.4. ECM 网口 配置
- Linux Kernel Kconfig 文件中 :
使能 CDC ECM 类型的 Gadget functions ::
> Device Drivers > USB support > USB Gadget Support

 <*>   USB Gadget functions configurable through configfs
 [*]     Ethernet Control Model (CDC ECM)
使能 TCP/IP 支持:
> Networking support > Networking options

 [*] TCP/IP networking
- 通过用户态的 configfs 文件接口创建包含
CDC ECM以太网功能的 USB Device:
mount -t configfs none /sys/kernel/config
cd /sys/kernel/config/usb_gadget
mkdir g_ecm
cd g_ecm
echo "0x1d6b" > idVendor
echo "0x0104" > idProduct
mkdir strings/0x409
echo "0123456789" > strings/0x409/serialnumber
echo "AIC Inc." > strings/0x409/manufacturer
echo "Bar Gadget" > strings/0x409/product
mkdir functions/ecm.usb0
mkdir configs/c.1
mkdir configs/c.1/strings/0x409
echo "ECM" > configs/c.1/strings/0x409/configuration
ln -s functions/ecm.usb0 configs/c.1
echo `ls /sys/class/udc` > UDC

ifconfig usb0 up
ifconfig usb0 173.11.1.1
- 用户使用:和上一节 NCM 网口 一样。
1.2.3.5. ADBD 配置
- Linux Kernel Kconfig 文件中 :
使能 FunctionFS 类型的 Gadget functions ::
> Device Drivers > USB support > USB Gadget Support

 <*>   USB Gadget functions configurable through configfs
 [*]     Function filesystem (FunctionFS)
使能 TCP/IP 支持:
> Networking support > Networking options

 [*] TCP/IP networking
- 通过用户态的 configfs 文件接口创建
FunctionFS中的 USB Device,挂载完 FunctionFS 文件系统以后,adbd通过/dev/usb-ffs/adb中映射成文件的 endpoint 直接和 USB Host 进行通讯:
mkdir /dev/pts
mount -t devpts none /dev/pts

mount -t configfs none /sys/kernel/config
cd /sys/kernel/config/usb_gadget
mkdir g_adb
cd g_adb
echo "0x18d1" > idVendor
echo "0x4e26" > idProduct
mkdir configs/c.1
mkdir functions/ffs.adb
mkdir strings/0x409
mkdir configs/c.1/strings/0x409
echo "0123456789ABCDEF" > strings/0x409/serialnumber
echo "AIC Inc." > strings/0x409/manufacturer
echo "FunctionFS gadget (adb)" > strings/0x409/product
echo "Conf 1" > configs/c.1/strings/0x409/configuration
echo 120 > configs/c.1/MaxPower
ln -s functions/ffs.adb configs/c.1

mkdir -p /dev/usb-ffs/adb
mount -o uid=2000,gid=2000 -t functionfs adb /dev/usb-ffs/adb

ifconfig lo up
ifconfig

cd /root
adbd&

sleep 1
echo `ls /sys/class/udc/` > /sys/kernel/config/usb_gadget/g_adb/UDC
-
用户使用:
- 将单板的 USB Device 端口和 PC 的 USB Host 端口连接,在 PC 端运行
adb shell命令即可进行 adb 操作。
- 将单板的 USB Device 端口和 PC 的 USB Host 端口连接,在 PC 端运行
1.3. USB OTG 配置
USB Host 0 和 USB Device 0 共享 1 路 phy。要么同时只能启用其中一种功能,要么启用 USB OTG 功能通过 id 管脚的值来动态切换对外功能。
- Linux Kernel Kconfig 文件中使能相应 OTG Driver:
> Device Drivers > USB support

  [*]   OTG support
  [*]     Support for Artinchip on-chip OTG Switch
- DTS 文件中配置相应 OTG Device:
otg: usb-otg {
    compatible = "artinchip,aic-otg-v2.0";
};

&otg {
    otg-mode = "auto";      //  = auto/host/device
    id-gpios = <&gpio_f 15 GPIO_ACTIVE_HIGH>;
    vbus-en-gpios = <&gpio_a 7 GPIO_ACTIVE_HIGH>;
    dp-sw-gpios = <&gpio_e 14 GPIO_ACTIVE_LOW>;
    status = "okay";
};
1.3.1. OTG 模式配置
OTG 可以配置成 Auto 模式 或者 Force 模式 :
Auto 模式。根据id管脚的电平来决定当前 OTG 端口工作模式为Host/Device,通常情况下id = low对应Host模式,id = high对应Device模式。Force 模式。手工配置工作模式,通过配置/sys/devices/platform/soc/soc\:usb-otg/otg_mode文件节点的值来改变当前 OTG 端口的工作模式,host对应Host模式,device对应Device模式。另外auto对应Auto模式,需要使用id管脚来进行判断。
两种模式对应 DTS 文件中的 otg 节点的不同配置:
| Mode | DTS otg-mode 属性 | DTS xxx-gpios 属性 | 运行时 Host / Device 切换方法 |
|---|---|---|---|
| Auto | otg-mode = "auto"; (如果没有配置 otg-mode 属性, 默认也是 Auto 模式) | id-gpios 属性必须配置; vbus-en-gpios 和 dp-sw-gpios 属性根据硬件配置选配。 | OTG 驱动根据 id-gpios 管脚的电平变化 自动切换 USB 工作模式为 Host / Device。 |
| Force | otg-mode = "device"; 或者 otg-mode = "host"; | id-gpios 属性不需要配置; vbus-en-gpios 和 dp-sw-gpios 属性根据硬件配置选配。 | 需要配置文件节点来手工切换: echo devices > /sys/devices/platform/soc/soc\:usb-otg/otg_mode 或者 echo host > /sys/devices/platform/soc/soc\:usb-otg/otg_mode |
1.3.2. OTG 相关 GPIO
从上面配置可以看到和 OTG 功能相关的 GPIO 管脚有 3 个:
-
id-gpios。用来检测当前插入的是不是 OTG 线,如果为 OTG 线则需要把本机切换到 USB Host 模式,否则本机切换到 USB Device 模式。该管脚在Auto 模式模式下是必须配置的,如果缺少该管脚 OTG 只能工作在Force 模式手工进行切换。 -
vbus-en-gpios。该管脚是用来控制 VBUS 的 5V 输出的,通常情况下:切换到 USB Host 模式时需要使能本机端的 VBUS 5V 输出给对端 Device 供电,切换到 USB Device 模式时需要关闭本机端的 VBUS 5V 输出转而对端 Host 的供电。(实际使用上来说,不论本端是 Host/Device 模式,也可以在 VBUS 上一直供电 5V 两边 VBUS 无压差则无漏电,这种情况下vbus-en-gpios无需配置。) -
dp-sw-gpios。该管脚是在 OTG 外出两个独立 Host、Device 端口时,用来控制外部 Switch 的。非该模式时,dp-sw-gpios无需配置。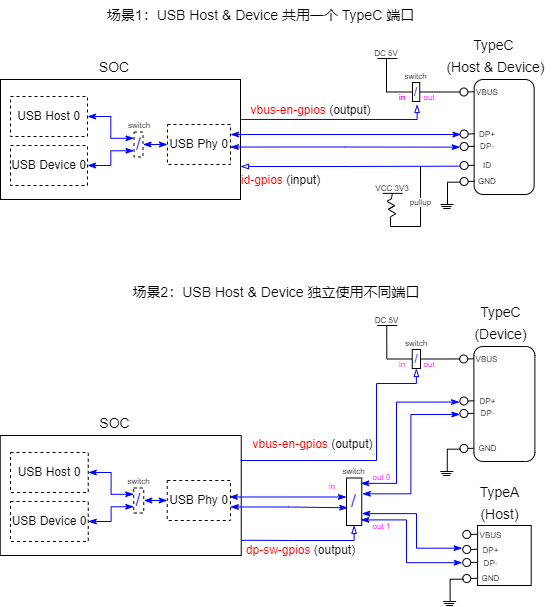
3 个 GPIO 管脚的具体使用场景如上图所示,用户根据自己的使用场景来选择配置哪些 GPIO。每个 GPIO 的 输入输出正反电平有效,可以通过 DTS 中的 GPIO_ACTIVE_HIGH 和 GPIO_ACTIVE_LOW 来配置:
| GPIO Name | Direction | GPIO_ACTIVE_HIGH | GPIO_ACTIVE_LOW |
|---|---|---|---|
id-gpios | input | 输入低电平 = Host,�输入高电平 = Device | 输入低电平 = Device,输入高电平 = Host |
vbus-en-gpios | output | Host (VBUS on) = 输出高电平Device (VBUS off) = 输出低电平 | Host (VBUS on) = 输出低电平Device (VBUS off) = 输出高电平 |
dp-sw-gpios | output | Host = 输出高电平Device = 输出低电平 | Host = 低电平Device = 高电平 |
2. 调试指南
2.1. USB Host 调试
2.1.1. 查看 USB 设备
在单板的 USB Host 端口有设备插入或者拔出时,单板串口会有打印提示:
[aic@] #
[ 6792.678130] usb 1-1: new high-speed USB device number 2 using aic-ehci
[ 6792.884601] usb-storage 1-1:1.0: USB Mass Storage device detected
[ 6792.910596] scsi host0: usb-storage 1-1:1.0
[ 6793.970429] scsi 0:0:0:0: Direct-Access     SanDisk  Cruzer Blade     1.00 PQ: 0 ANSI: 6
[ 6793.995300] sd 0:0:0:0: [sda] 30842880 512-byte logical blocks: (15.8 GB/14.7 GiB)
[ 6794.018466] sd 0:0:0:0: [sda] Write Protect is off
[ 6794.025383] sd 0:0:0:0: [sda] Write cache: disabled, read cache: enabled, doesn't support DPO or FUA
[ 6794.055267]  sda: sda1
[ 6794.074720] sd 0:0:0:0: [sda] Attached SCSI removable disk
[ 6806.436142] usb 1-1: USB disconnect, device number 2
也可以使用 lsusb 命令查看目前系统 USB 总线的情况:
[aic@] # lsusb
Bus 001 Device 001: ID 1d6b:0002
Bus 001 Device 003: ID 0781:5567
如果是 PC 上的 Linux 发行版, lsusb -v 命令可以查看 USB 设备的详细信息。但是单板上使用的 lsusb -v 被进行了简化。
2.1.2. Sysfs 节点
也可以使用 /sys/kernel/debug/usb/devices 文件节点查看 USB 设备的详细信息:
[aic@] # mount -t debugfs none /sys/kernel/debug

[aic@] # cat /sys/kernel/debug/usb/devices

T:  Bus=01 Lev=00 Prnt=00 Port=00 Cnt=00 Dev#=  1 Spd=480  MxCh= 1
B:  Alloc=  0/800 us ( 0%), #Int=  0, #Iso=  0
D:  Ver= 2.00 Cls=09(hub  ) Sub=00 Prot=00 MxPS=64 #Cfgs=  1
P:  Vendor=1d6b ProdID=0002 Rev= 5.10
S:  Manufacturer=Linux 5.10.44-00071-g935288d48127-dirty ehci_hcd
S:  Product=EHCI Host Controller
S:  SerialNumber=10220000.usb
C:* #Ifs= 1 Cfg#= 1 Atr=e0 MxPwr=  0mA
I:* If#= 0 Alt= 0 #EPs= 1 Cls=09(hub  ) Sub=00 Prot=00 Driver=hub
E:  Ad=81(I) Atr=03(Int.) MxPS=   4 Ivl=256ms
2.1.3. USB 总线分析仪
在 USB 设备不能正常枚举或者 USB 通讯过程中出现问题时,我们一般使用 USB 总线分析仪,接入到 USB 总线上进行旁路抓包分析。
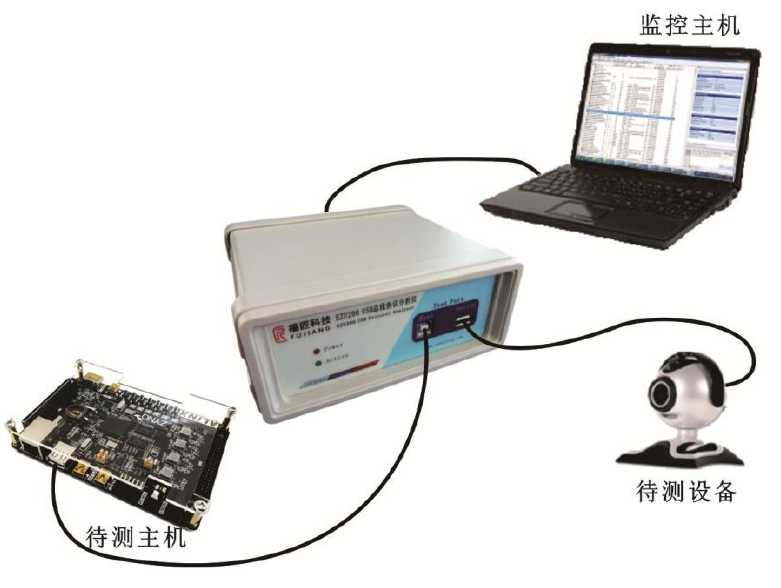
抓包数据的分析界面如下图所示:

USB 总线分析仪对抓取的数据包进行了解析,用起来非常方便。市面上这类仪器大同小异,非常容易上手。
2.1.4. usbmon
在没有外部 USB 分析仪的情况下,也可以使用 Linux 内核自带的 USB 抓包模块 usbmon 来抓取数据包进行分析。
- 首先得打开 Linux 内核中的 usbmon 配置:
> Device Drivers > USB support

 <*>   USB Monitor
- 重新编译内核后就可以进行抓包了:
[aic@] # mount -t debugfs none /sys/kernel/debug

[aic@] # ls /sys/kernel/debug/usb/usbmon/
0s  0u  1s  1t  1u  2s  2t  2u
[aic@] # cat /sys/kernel/debug/usb/usbmon/0u
c1b0e380 68846726 C Ii:1:001:1 0:2048 1 = 02
c1b0e380 68846851 S Ii:1:001:1 -115:2048 4 <
c7a15900 68847426 S Ci:1:001:0 s a3 00 0000 0001 0004 4 <
c7a15900 68847507 C Ci:1:001:0 0 4 = 01050100
c7a15900 68847595 S Co:1:001:0 s 23 01 0010 0001 0000 0
c7a15900 68847652 C Co:1:001:0 0 0
c7a15900 68847732 S Ci:1:001:0 s a3 00 0000 0001 0004 4 <
c7a15900 68847790 C Ci:1:001:0 0 4 = 01050000
c7a15900 68890082 S Ci:1:001:0 s a3 00 0000 0001 0004 4 <
c7a15900 68890154 C Ci:1:001:0 0 4 = 01050000
c7a15900 68940072 S Ci:1:001:0 s a3 00 0000 0001 0004 4 <
c7a15900 68940142 C Ci:1:001:0 0 4 = 01050000
c7a15900 68990067 S Ci:1:001:0 s a3 00 0000 0001 0004 4 <
c7a15900 68990129 C Ci:1:001:0 0 4 = 01050000
2.2. USB Device 调试
2.2.1. 查看 USB 设备
当单板充当 USB Device 连接到 PC 主机 USB Host 端口时,可以在主机上查看 USB 设备有没有成功被枚举:
-
Linux 主机,可以通过
lsusb命令进行查看。 -
Windows 主机,可以通过
设备管理器命令进行查看: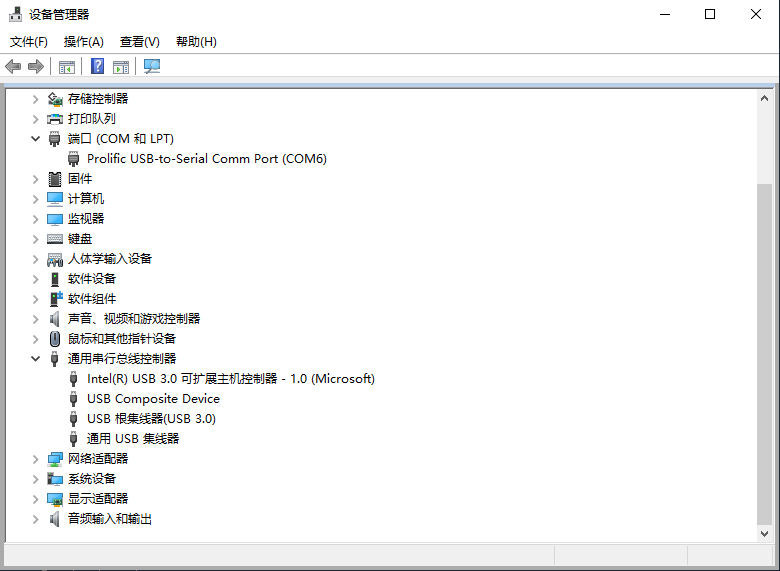
2.2.2. Sysfs 节点
在单板上也可以通过 /sys/kernel/debug/usb/xxxx.usb/ 文件夹下的文件节点,对 UDC 驱动进行配置:
[aic@] # ls /sys/class/udc
10200000.usb
[aic@] # ls /sys/kernel/debug/usb/10200000.usb/
dr_mode    ep1out     ep3in      ep4out     params     testmode
ep0        ep2in      ep3out     fifo       regdump
ep1in      ep2out     ep4in      hw_params  state
[aic@] #
例如可以 dump 寄存器::
[aic@] # cat /sys/kernel/debug/usb/10200000.usb/regdump
GOTGCTL = 0x00000000
GOTGINT = 0x00000000
GAHBCFG = 0x00000000
GUSBCFG = 0x00000000
GRSTCTL = 0x00000000
GINTSTS = 0x00000000
GINTMSK = 0x00000000
GRXSTSR = 0x00000000
GRXFSIZ = 0x00000000
GNPTXFSIZ = 0x00000000
GNPTXSTS = 0x00000000
2.2.3. 抓包工具
和 USB Host 调试一样,抓包可以使用专门的 USB 总线分析仪或者在 Linux 主机上使用 usbmon 进行抓包。
3. 测试指南
3.1. 测试方案介绍
在测试 USB 时,普通的做法是找一些 U 盘、鼠标、键盘 等外设来做一些测试,但是这些测试还是偏上层偏功能的。相比较 HC (USB Host Controller) 和 UDC (USB Device Controller) 按照USB协议提供的完整功能来说,这种测试验证时不充分的。
在 Linux Kernel 中对 HC/UDC 有一套专有的测试方案,在底层对 control/bulk/int/iso 几种 endpoint 进行针对性的功能和压力测试。
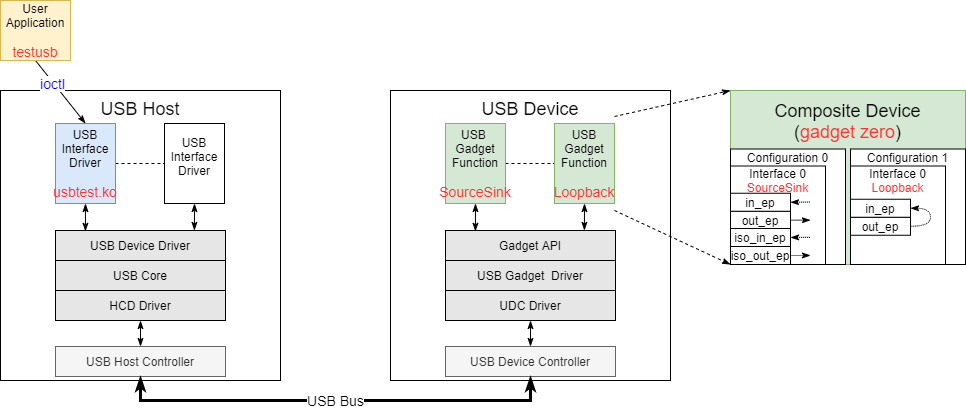
上图的测试方案由几部分组成:
- 1、Device 侧的
gadget zero测试设备,提供了测试通道。 - 2、Host 侧的
usbtest.ko测试驱动,封装了 30 个 endpoint 层级的测试用例。 - 3、Host 侧的
testusb用户程序,用来调用usbtest.ko提供的测试用例。
3.2. Device 侧 gadget zero
提供测试需要的Device设备有很多种方式,例如可用使用专门的测试 Device 里面烧录专有的测试 Firmware。节约成本的方式还是使用 Linux gadget 功能来动态模拟 USB Device 设备。针对 USB 测试,Linux 专门提供了 gadget zero 设备。
3.2.1. Device 创建
gadget zero 的核心是创建一个 Composite Device ,其包含了两个 Configuration ,其中一个 Configuration 0 包含 SourceSink Function/Interface ,另一个 Configuration 1 包含 Loopback Function/Interface 。某一时刻只能选择使用一个 Configuration ,通常情况下使用 Configuration 0 即 SourceSink 的功能。
gadget zero Device 由两种方式创建:
- 1、通过
zero_driver创建,只要把对应驱动文件drivers\usb\gadget\legacy\zero.c编译进内核即可。 - 2、通过
functionfs动态创建,这种方式更灵活,实例命令如下:
mount -t configfs none /sys/kernel/config
cd /sys/kernel/config/usb_gadget

mkdir g2
cd g2

echo "0x04e8" > idVendor
echo "0x2d01" > idProduct

mkdir configs/c.1
mkdir configs/c.2
mkdir functions/Loopback.0
mkdir functions/SourceSink.0

mkdir strings/0x409
mkdir configs/c.1/strings/0x409
mkdir configs/c.2/strings/0x409

echo "0x0525" > idVendor
echo "0xa4a0" > idProduct

echo "0123456789" > strings/0x409/serialnumber
echo "Samsung Inc." > strings/0x409/manufacturer
echo "Bar Gadget" > strings/0x409/product

echo "Conf 1" > configs/c.1/strings/0x409/configuration
echo "Conf 2" > configs/c.2/strings/0x409/configuration
echo 120 > configs/c.1/MaxPower

// SourceSink:驱动 set configuration 会选取 第一个 configuration
ln -s functions/Loopback.0 configs/c.2
ln -s functions/SourceSink.0 configs/c.1

echo 4100000.udc-controller > UDC
整个过程就是创建了一个 Vendor ID = 0x0525 、 Product ID = 0xa4a0 的 Composite Device ,在 Host 侧可以查看这个设备:
$ lsusb -s 1:3
Bus 001 Device 003: ID 0525:a4a0 Netchip Technology, Inc. Linux-USB "Gadget Zero"

$ lsusb -v -s 1:3

Bus 001 Device 003: ID 0525:a4a0 Netchip Technology, Inc. Linux-USB "Gadget Zero"
Couldn't open device, some information will be missing
Device Descriptor:
bLength                18
bDescriptorType         1
bcdUSB               2.00
bDeviceClass            0
bDeviceSubClass         0
bDeviceProtocol         0
bMaxPacketSize0        64
idVendor           0x0525 Netchip Technology, Inc.
idProduct          0xa4a0 Linux-USB "Gadget Zero"
bcdDevice            5.10
iManufacturer           1
iProduct                2
iSerial                 3
bNumConfigurations      2
Configuration Descriptor:
    bLength                 9
    bDescriptorType         2
    wTotalLength       0x0045
    bNumInterfaces          1
    bConfigurationValue     1
    iConfiguration          4
    bmAttributes         0x80
    (Bus Powered)
    MaxPower              120mA
    Interface Descriptor:
    bLength                 9
    bDescriptorType         4
    bInterfaceNumber        0
    bAlternateSetting       0
    bNumEndpoints           2
    bInterfaceClass       255 Vendor Specific Class
    bInterfaceSubClass      0
    bInterfaceProtocol      0
    iInterface              0
    Endpoint Descriptor:
        bLength                 7
        bDescriptorType         5
        bEndpointAddress     0x81  EP 1 IN
        bmAttributes            2
        Transfer Type            Bulk
        Synch Type               None
        Usage Type               Data
        wMaxPacketSize     0x0200  1x 512 bytes
        bInterval               0
    Endpoint Descriptor:
        bLength                 7
        bDescriptorType         5
        bEndpointAddress     0x01  EP 1 OUT
        bmAttributes            2
        Transfer Type            Bulk
        Synch Type               None
        Usage Type               Data
        wMaxPacketSize     0x0200  1x 512 bytes
        bInterval               0
    Interface Descriptor:
    bLength                 9
    bDescriptorType         4
    bInterfaceNumber        0
    bAlternateSetting       1
    bNumEndpoints           4
    bInterfaceClass       255 Vendor Specific Class
    bInterfaceSubClass      0
    bInterfaceProtocol      0
    iInterface              0
    Endpoint Descriptor:
        bLength                 7
        bDescriptorType         5
        bEndpointAddress     0x81  EP 1 IN
        bmAttributes            2
        Transfer Type            Bulk
        Synch Type               None
        Usage Type               Data
        wMaxPacketSize     0x0200  1x 512 bytes
        bInterval               0
    Endpoint Descriptor:
        bLength                 7
        bDescriptorType         5
        bEndpointAddress     0x01  EP 1 OUT
        bmAttributes            2
        Transfer Type            Bulk
        Synch Type               None
        Usage Type               Data
        wMaxPacketSize     0x0200  1x 512 bytes
        bInterval               0
    Endpoint Descriptor:
        bLength                 7
        bDescriptorType         5
        bEndpointAddress     0x82  EP 2 IN
        bmAttributes            1
        Transfer Type            Isochronous
        Synch Type               None
        Usage Type               Data
        wMaxPacketSize     0x0400  1x 1024 bytes
        bInterval               4
    Endpoint Descriptor:
        bLength                 7
        bDescriptorType         5
        bEndpointAddress     0x02  EP 2 OUT
        bmAttributes            1
        Transfer Type            Isochronous
        Synch Type               None
        Usage Type               Data
        wMaxPacketSize     0x0400  1x 1024 bytes
        bInterval               4
Configuration Descriptor:
    bLength                 9
    bDescriptorType         2
    wTotalLength       0x0020
    bNumInterfaces          1
    bConfigurationValue     2
    iConfiguration          5
    bmAttributes         0x80
    (Bus Powered)
    MaxPower                2mA
    Interface Descriptor:
    bLength                 9
    bDescriptorType         4
    bInterfaceNumber        0
    bAlternateSetting       0
    bNumEndpoints           2
    bInterfaceClass       255 Vendor Specific Class
    bInterfaceSubClass      0
    bInterfaceProtocol      0
    iInterface              6
    Endpoint Descriptor:
        bLength                 7
        bDescriptorType         5
        bEndpointAddress     0x81  EP 1 IN
        bmAttributes            2
        Transfer Type            Bulk
        Synch Type               None
        Usage Type               Data
        wMaxPacketSize     0x0200  1x 512 bytes
        bInterval               0
    Endpoint Descriptor:
        bLength                 7
        bDescriptorType         5
        bEndpointAddress     0x01  EP 1 OUT
        bmAttributes            2
        Transfer Type            Bulk
        Synch Type               None
        Usage Type               Data
        wMaxPacketSize     0x0200  1x 512 bytes
        bInterval               0
3.2.2. SourceSink Function
SourceSink Function 的主要功能是提供了一组 USB 测试 endpoint,其中:
Sink。sinks bulk packets OUT to the peripheral。意思是把数据从 Host 引流到 Device,即OUT方向。Source。sources them IN to the host。意思是把从 Device 发送数据到 Device,即IN方向。
具体提供了 4 组 测试 endpoint:
| Endpoint | Type | Direction | Descript| |
|---|---|---|---|
| in_ep | bulk | IN | Source 发送数据到 Host, 注意这数据是 Device 主动生成的 |
| out_ep | bulk | OUT | Sink 接收 Host 的数据 |
| iso_in_ep | iso | IN | Source 发送数据到 Host |
| iso_out_ep | iso | OUT | Sink 接收 Host 的数据 |
主要流程如下:
drivers\usb\gadget\function\f_sourcesink.c:

sourcesink_bind():

static int
sourcesink_bind(struct usb_configuration *c, struct usb_function *f)
{

    /* (1) 从 gadget 中分配 2 个 bulk endpoint */
    /* allocate bulk endpoints */
    ss->in_ep = usb_ep_autoconfig(cdev->gadget, &fs_source_desc);

    ss->out_ep = usb_ep_autoconfig(cdev->gadget, &fs_sink_desc);

    /* (2) 如果支持ISO,再从 gadget 中分配 2 个 iso endpoint */
    /* allocate iso endpoints */
    ss->iso_in_ep = usb_ep_autoconfig(cdev->gadget, &fs_iso_source_desc);
    if (!ss->iso_in_ep)
        goto no_iso;

    ss->iso_out_ep = usb_ep_autoconfig(cdev->gadget, &fs_iso_sink_desc);
    if (!ss->iso_out_ep) {

}

sourcesink_set_alt() → enable_source_sink() → usb_ep_enable()/source_sink_start_ep():
// 启动上述 endpoint

→ source_sink_complete():
// urb 的 complete() 函数,urb 发送/接收完成后,重新挂载 urb
还支持一些参数调整:
# ls functions/SourceSink.0/
bulk_buflen     iso_qlen        isoc_maxburst   isoc_mult
bulk_qlen       isoc_interval   isoc_maxpacket  pattern
3.2.3. Loopback Function
Loopback Function 提供的功能更为简单,它分配了两个 bulk endpoint,所做的�就是把 out_ep 接收到的数据 转发到 in_ep。
主要流程如下:
drivers\usb\gadget\function\f_loopback.c:

loopback_bind():

static int loopback_bind(struct usb_configuration *c, struct usb_function *f)
{
    /* (1) 从 gadget 中分配 2 个 bulk endpoint */
    /* allocate endpoints */
    loop->in_ep = usb_ep_autoconfig(cdev->gadget, &fs_loop_source_desc);

    loop->out_ep = usb_ep_autoconfig(cdev->gadget, &fs_loop_sink_desc);
}

loopback_set_alt() → enable_loopback() → alloc_requests():

static int alloc_requests(struct usb_composite_dev *cdev,
            struct f_loopback *loop)
{

    for (i = 0; i < loop->qlen && result == 0; i++) {
        result = -ENOMEM;

        in_req = usb_ep_alloc_request(loop->in_ep, GFP_ATOMIC);
        if (!in_req)
            goto fail;

        out_req = lb_alloc_ep_req(loop->out_ep, loop->buflen);
        if (!out_req)
            goto fail_in;

        in_req->complete = loopback_complete;
        out_req->complete = loopback_complete;

        in_req->buf = out_req->buf;
        /* length will be set in complete routine */
        in_req->context = out_req;
        out_req->context = in_req;

        /* (2) 先启动 OUT endpoint */
        result = usb_ep_queue(loop->out_ep, out_req, GFP_ATOMIC);
        if (result) {
            ERROR(cdev, "%s queue req --> %d\n",
                    loop->out_ep->name, result);
            goto fail_out;
        }
    }

}

static void loopback_complete(struct usb_ep *ep, struct usb_request *req)
{
    struct f_loopback       *loop = ep->driver_data;
    struct usb_composite_dev *cdev = loop->function.config->cdev;
    int                     status = req->status;

    switch (status) {
    case 0:                         /* normal completion? */
        if (ep == loop->out_ep) {
            /*
            * We received some data from the host so let's
            * queue it so host can read the from our in ep
            */
            struct usb_request *in_req = req->context;

            in_req->zero = (req->actual < req->length);
            in_req->length = req->actual;
            ep = loop->in_ep;
            req = in_req;
        } else {
            /*
            * We have just looped back a bunch of data
            * to host. Now let's wait for some more data.
            */
            req = req->context;
            ep = loop->out_ep;
        }

        /* (3) 环回的关键:
                OUT endpoint 接收到的数据 转发到 IN endpoint
                IN endpoint 数据发送完成后 req 重新挂载到 OUT endpoint
        */
        /* queue the buffer back to host or for next bunch of data */
        status = usb_ep_queue(ep, req, GFP_ATOMIC);

}
也支持一些参数调整:
# ls functions/Loopback.0/
bulk_buflen  qlen
3.3. Host 侧 usbtest.ko
在 Host 侧的 usbtest.ko 它就是一个标准的 usb interface driver。它根据 Vendor ID = 0x0525 、 Product ID = 0xa4a0 适配上一节 Composite Device 中的 SourceSink Interface 或者 Loopback Interface。
static const struct usb_device_id id_table[] = {

    /* "Gadget Zero" firmware runs under Linux */
    { USB_DEVICE(0x0525, 0xa4a0),
        .driver_info = (unsigned long) &gz_info,
    },

}
MODULE_DEVICE_TABLE(usb, id_table);

static struct usb_driver usbtest_driver = {
    .name =         "usbtest",
    .id_table =     id_table,
    .probe =        usbtest_probe,
    .unlocked_ioctl = usbtest_ioctl,
    .disconnect =   usbtest_disconnect,
    .suspend =      usbtest_suspend,
    .resume =       usbtest_resume,
};
3.3.1. TestCase
其在 SourceSink Interface 提供的 4 个测试 endpoint、或者 Loopback Interface 提供的 2 个测试 endpoint + Composite Device 本身的 ep0 control endpoint 基础之上,提供了 30 个 testcase:
drivers\usb\misc\usbtest.c:

usbtest_do_ioctl()
| index | type | iterations | vary | sglen | unaligned | testcase | descript |
|---|---|---|---|---|---|---|---|
| 0 | nop | “TEST 0: NOPn” | |||||
| 1 | bulk | Y | “TEST 1: write %d bytes %u timesn”, param->length, param->iterations | Simple non-queued bulk I/O tests | |||
| 2 | bulk | Y | “TEST 2: read %d bytes %u timesn”, param->length, param->iterations | ||||
| 3 | bulk | Y | Y | “TEST 3: write/%d 0..%d bytes %u timesn”, param->vary, param->length, param->iterations | |||
| 4 | bulk | Y | Y | “TEST 4: read/%d 0..%d bytes %u timesn”, param->vary, param->length, param->iterations | |||
| 5 | bulk | Y | Y | “TEST 5: write %d sglists %d entries of %d bytesn”, param->iterations,param->sglen, param->length | Queued bulk I/O tests | ||
| 6 | bulk | Y | Y | “TEST 6: read %d sglists %d entries of %d bytesn”, param->iterations,param->sglen, param->length | |||
| 7 | bulk | Y | Y | Y | “TEST 7: write/%d %d sglists %d entries 0..%d bytesn”, param->vary, param->iterations,param->sglen, param->length | ||
| 8 | bulk | Y | Y | Y | “TEST 8: read/%d %d sglists %d entries 0..%d bytesn”, param->vary, param->iterations,param->sglen, param->length | ||
| 9 | control | Y | “TEST 9: ch9 (subset) control tests, %d timesn”, param->iterations | non-queued sanity tests for control (chapter 9 subset) | |||
| 10 | control | Y | Y | “TEST 10: queue %d control calls, %d timesn”, param->sglen, param->iterations) | queued control messaging | ||
| 11 | bulk | Y | “TEST 11: unlink %d reads of %dn”, param->iterations, param->length | simple non-queued unlinks (ring with one urb) | |||
| 12 | bulk | Y | “TEST 12: unlink %d writes of %dn”, param->iterations, param->length | ||||
| 13 | control | Y | “TEST 13: set/clear %d haltsn” param->iterations | ep halt tests | |||
| 14 | control | Y | Y | “TEST 14: %d ep0out, %d..%d vary %dn”, param->iterations,realworld ? 1 : 0, param->length,param->vary | control write tests | ||
| 15 | iso | Y | Y | “TEST 15: write %d iso, %d entries of %d bytesn”, param->iterations, param->sglen, param->length | iso write tests | ||
| 16 | iso | Y | Y | “TEST 16: read %d iso, %d entries of %d bytesn”, param->iterations, param->sglen, param->length | iso read tests | ||
| 17 | bulk | Y | Y | “TEST 17: write odd addr %d bytes %u times core mapn” param->length, param->iterations | Tests for bulk I/O using DMA mapping by core and odd address | ||
| 18 | bulk | Y | Y | “TEST 18: read odd addr %d bytes %u times core mapn”, param->length, param->iterations | |||
| 19 | bulk | Y | Y | “TEST 19: write odd addr %d bytes %u times premappedn”, param->length, param->iterations | Tests for bulk I/O using premapped coherent buffer and odd address | ||
| 20 | bulk | Y | Y | “TEST 20: read odd addr %d bytes %u times premappedn”, param->length, param->iterations | |||
| 21 | control | Y | Y | Y | “TEST 21: %d ep0out odd addr, %d..%d vary %dn”, param->iterations,realworld ? 1 : 0, param->length, param->vary | control write tests with unaligned buffer | |
| 22 | iso | Y | Y | Y | “TEST 22: write %d iso odd, %d entries of %d bytesn”, param->iterations, param->sglen, param->length | unaligned iso tests | |
| 23 | iso | Y | Y | Y | “TEST 23: read %d iso odd, %d entries of %d bytesn”, param->iterations, param->sglen, param->length | ||
| 24 | bulk | Y | Y | “TEST 24: unlink from %d queues of %d %d-byte writesn”, param->iterations, param->sglen, param->length | unlink URBs from a bulk-OUT queue | ||
| 25 | int | Y | “TEST 25: write %d bytes %u timesn”, param->length, param->iterations | Simple non-queued interrupt I/O tests | |||
| 26 | int | Y | “TEST 26: read %d bytes %u timesn”, param->length, param->iterations | ||||
| 27 | bulk | Y | Y | “TEST 27: bulk write %dMbytesn”, (param->iterations * param->sglen * param->length) / (1024 * 1024)) | Performance test | ||
| 28 | bulk | Y | Y | “TEST 28: bulk read %dMbytesn”, (param->iterations * param->sglen * param->length) / (1024 * 1024)) | |||
| 29 | bulk | Y | “TEST 29: Clear toggle between bulk writes %d timesn”, param->iterations | Test data Toggle/seq_nr clear between bulk out transfers |
3.3.2. Ioctl
usbtest.ko 以 ioctl 的形式向用户态提供对 testcase 的调用:
usbdev_file_operations → usbdev_ioctl() → usbdev_do_ioctl() → proc_ioctl_default() → proc_ioctl():

static int proc_ioctl(struct usb_dev_state *ps, struct usbdevfs_ioctl *ctl)
{

    /*  (1) 找到对应的 usb interface device */
    else if (!(intf = usb_ifnum_to_if(ps->dev, ctl->ifno)))
        retval = -EINVAL;

    /* talk directly to the interface's driver */
    default:
        if (intf->dev.driver)
            /*  (2) 找到 usb interface device 对应的 driver  */
            driver = to_usb_driver(intf->dev.driver);
        if (driver == NULL || driver->unlocked_ioctl == NULL) {
            retval = -ENOTTY;
        } else {
            /* (3) 调用 driver 的 ioctl 函数 */
            retval = driver->unlocked_ioctl(intf, ctl->ioctl_code, buf);
            if (retval == -ENOIOCTLCMD)
                retval = -ENOTTY;
        }

}

↓

usbtest_ioctl() → usbtest_do_ioctl()
3.4. Host 侧 testusb
testusb 源码包含在 linux 内核当中, 路径为 linux-5.10\tools\usb\testusb.c 。可以通过 luban 编译,或者简单编译:
gcc -Wall -g -lpthread -o testusb testusb.c
就可以启动测试了:
$ sudo ./testusb -a
unknown speed       /dev/bus/usb/001/002
/dev/bus/usb/001/002 test 0,    0.000011 secs
/dev/bus/usb/001/002 test 1,    1.625031 secs
/dev/bus/usb/001/002 test 2 --> 110 (Connection timed out)
/dev/bus/usb/001/002 test 3,    1.639717 secs
/dev/bus/usb/001/002 test 4 --> 110 (Connection timed out)
/dev/bus/usb/001/002 test 5,    1.915198 secs
/dev/bus/usb/001/002 test 6 --> 110 (Connection timed out)
/dev/bus/usb/001/002 test 7,    1.928419 secs
/dev/bus/usb/001/002 test 8 --> 110 (Connection timed out)
/dev/bus/usb/001/002 test 9,   13.835084 secs

sudo ./testusb -a

sudo ./testusb -a -t1 -c1 -s512 -g32 -v32

sudo ./testusb -a -t29 -c1 -s512 -g32 -v32

// test 10 需要特别注意,容易挂死 host
sudo ./testusb -a -t10 -c1 -s512 -g5 -v32
// test 28 需要特别注意,容易挂死 host
sudo ./testusb -a -t28 -c1 -s512 -g32 -v32
4. 设计说明
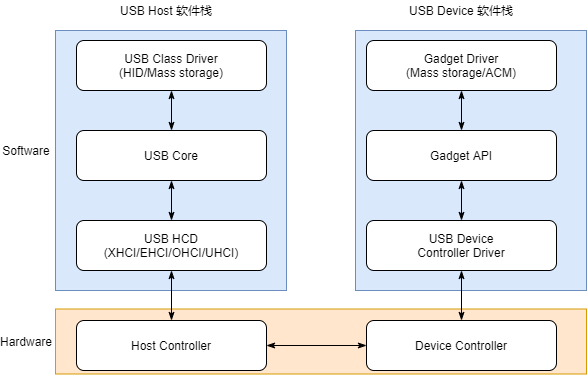
整个 USB 系统的软件栈如上图所示,本文仅描述其中的 HCD (Host Controller Driver) 和 DCD (Device Controller Driver)。
4.1. USB Host Controller Driver
下面以 EHCI 为例,说明 HCD 软件设计思想。
4.1.1. 源码说明
| 相关模块 | 源码路径 |
|---|---|
| EHCI | source\linux-5.10\drivers\usb\host\ehci-aic.c source\linux-5.10\drivers\usb\host\ehci-hcd.c source\linux-5.10\drivers\usb\host\ehci-mem.c source\linux-5.10\drivers\usb\host\ehci-q.c source\linux-5.10\drivers\usb\host\ehci-timer.c source\linux-5.10\drivers\usb\host\ehci-hub.c |
4.1.2. 模块架构
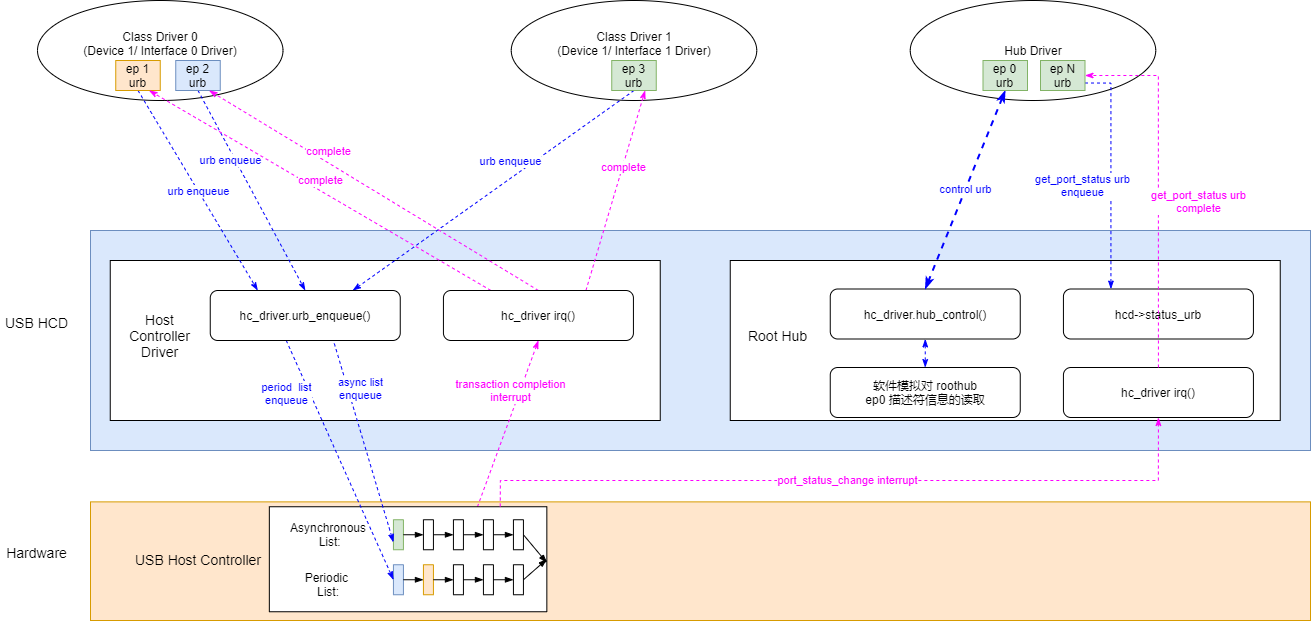
从 HCD (Host Controller Driver) 的框架图中可以看到,HCD 主要提供了两大功能:
- 普通 URB 数据收发功能。
将 USB Class Driver 下发的 URB,按照硬件控制器要求的格式,按分类发送到硬件 List 当中。
- RootHub URB 的处理功能。
对于 RootHub Driver 下发的 ep0 控制命令 URB,系统不会发送到硬件控制器之上,而是转发给 HCD 使用软件来模拟执行。
对于 RootHub Driver 下发的端口状态查询 URB,通过响应中断进行上报。
4.1.3. 关键流程
4.1.3.1. 初始化流程
HCD 驱动的入口是 platform 驱动,初始化流程先获取 irq、reg、clk、reset 等资源并进行初始化,最后调用 usb_add_hcd() 向系统中注册。
大致的流程如下:
|-->ehci_platform_init()
    |-->ehci_init_driver()
    |-->platform_driver_register()
        |-->aic_ehci_platform_probe()
            |-->hcd = usb_create_hcd()
            |-->irq = platform_get_irq(dev, 0);
            |-->priv->clks[i] = of_clk_get(dev->dev.of_node, i);
            |-->priv->rst[i] = devm_reset_control_get_shared_by_index(&dev->dev, i);
            |-->hcd->regs = devm_ioremap_resource(&dev->dev, res_mem);
            |-->aic_ehci_platform_power_on()
                |-->reset_control_deassert(priv->rst[i]);
                |-->clk_prepare_enable(priv->clks[i]);
            |-->usb_add_hcd(hcd, irq, IRQF_SHARED);
4.1.3.2. 普通 URB 处理流程
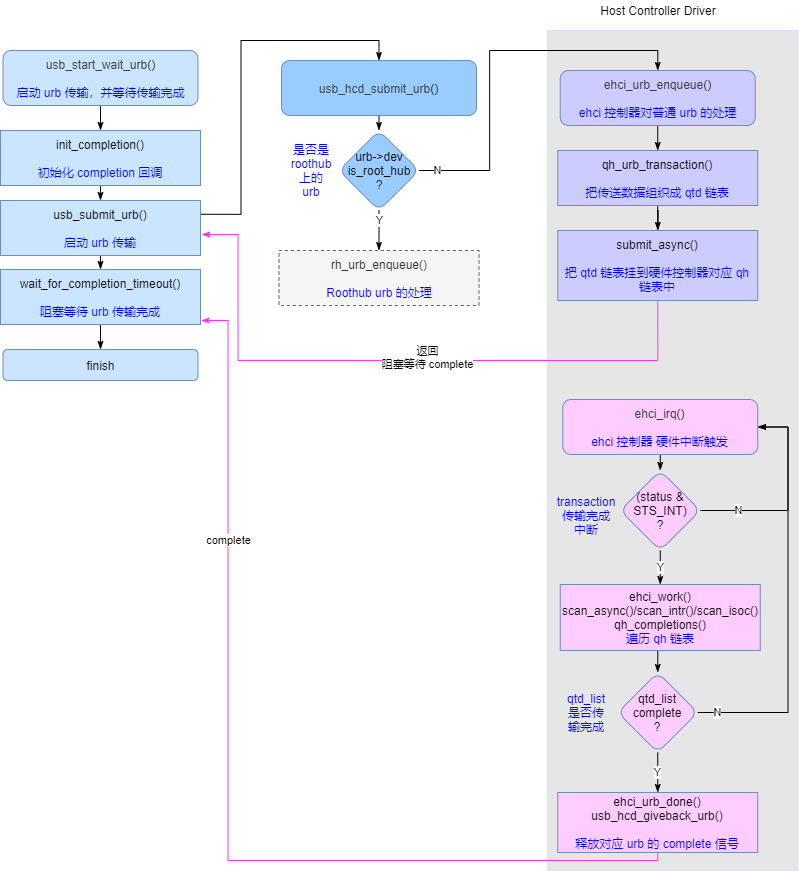
如上图所示,一个普通 urb 的处理分为两步:
- urb enqueue。首先调用 hcd 的
.urb_enqueue()函数,将需要传输的数据插入到硬件控制器的链表当中。 - urb complete。在链表中的一帧数据传输完成后硬件会产生
complete中断,在中断服务程序中对相应 urb 发送complete信号,让usb_start_wait_urb()的流程继续执行。
4.1.3.3. Roothub URB 处理流程

如上图所示,roothub urb 的处理分为两种类型:
- ep0 control urb。对于 roothub control urb,HCD 需要使用软件来模拟,实际上 urb 没有发送到硬件控制器中,因为是软件模拟所以无需等待
complete可以立即释放。 - 获取端口状态 urb。这类 urb 会阻塞等待端口状态改变,一旦端口状态改变会触发硬件中断,在中断处理中唤醒对应 urb 的
complete信号,让usb_start_wait_urb()的流程继续执行。
4.1.4. 数据结构
4.1.4.1. ehci_hc_driver
HCD 核心的数据结构为 hc_driver,EHCI 实现了以下的核心函数:
static const struct hc_driver ehci_hc_driver = {
    .description =          hcd_name,
    .product_desc =         "EHCI Host Controller",
    .hcd_priv_size =        sizeof(struct ehci_hcd),

    /*
    * generic hardware linkage
    */
    .irq =                  ehci_irq,
    .flags =                HCD_MEMORY | HCD_DMA | HCD_USB2 | HCD_BH,

    /*
    * basic lifecycle operations
    */
    .reset =                ehci_setup,
    .start =                ehci_run,
    .stop =                 ehci_stop,
    .shutdown =             ehci_shutdown,

    /*
    * managing i/o requests and associated device resources
    */
    .urb_enqueue =          ehci_urb_enqueue,
    .urb_dequeue =          ehci_urb_dequeue,
    .endpoint_disable =     ehci_endpoint_disable,
    .endpoint_reset =       ehci_endpoint_reset,
    .clear_tt_buffer_complete =     ehci_clear_tt_buffer_complete,

    /*
    * scheduling support
    */
    .get_frame_number =     ehci_get_frame,

    /*
    * root hub support
    */
    .hub_status_data =      ehci_hub_status_data,
    .hub_control =          ehci_hub_control,
    .bus_suspend =          ehci_bus_suspend,
    .bus_resume =           ehci_bus_resume,
    .relinquish_port =      ehci_relinquish_port,
    .port_handed_over =     ehci_port_handed_over,
    .get_resuming_ports =   ehci_get_resuming_ports,

    /*
    * device support
    */
    .free_dev =             ehci_remove_device,
};
4.1.5. 接口设计
4.1.5.1. ehci_urb_enqueue
| 函数原型 | int ehci_urb_enqueue (struct usb_hcd *hcd, struct urb *urb, gfp_t mem_flags) |
|---|---|
| 功能说明 | 接收上层传入的 urb,并将其压入 EHCI 的硬件队列。 |
| 参数定义 | hcd:当前 hcd 控制结构 urb:当前 urb 控制结构 mem_flags:分配内存时使用的标志 |
| 返回值 | 0,成功; < 0,失败 |
| 注意事项 |
4.1.5.2. ehci_hub_control
| 函数原型 | int ehci_hub_control (struct usb_hcd *hcd, u16 typeReq, u16 wValue, u16 wIndex, char *buf, u16 wLength) |
|---|---|
| 功能说明 | 处理 roothub 相关的 control 命令。 |
| 参数定义 | hcd:当前 hcd 控制结构 typeReq:setup token 中的对应字段 wValue:setup token 中的对应字段 wIndex:setup token 中的对应字段 buf:setup data 需要的数据 wLength:setup token 中的对应字段 |
| 返回值 | 0,成功; < 0,失败 |
| 注意事项 |
4.1.5.3. ehci_hub_status_data
| 函数原型 | int ehci_hub_status_data (struct usb_hcd *hcd, char *buf) |
|---|---|
| 功能说明 | 查询 hub 端口状态。 |
| 参数定义 | hcd:当前 hcd 控制结构 buf:返回获取的 hub 端口状态 |
| 返回值 | >0,成功获取端口状态的长度; = 0,失败 |
| 注意事项 |
4.2. USB Device Controller Driver
Linux 利用 Device Controller Driver 把整个单板模拟成一个 USB Device 设备。
4.2.1. 源码说明
| 相关模块 | 源码路径 |
|---|---|
| AIC UDC | source\linux-5.10\drivers\usb\gadget\udc\aic_udc.c source\linux-5.10\drivers\usb\gadget\udc\aic_udc.h |
4.2.2. 模块架构
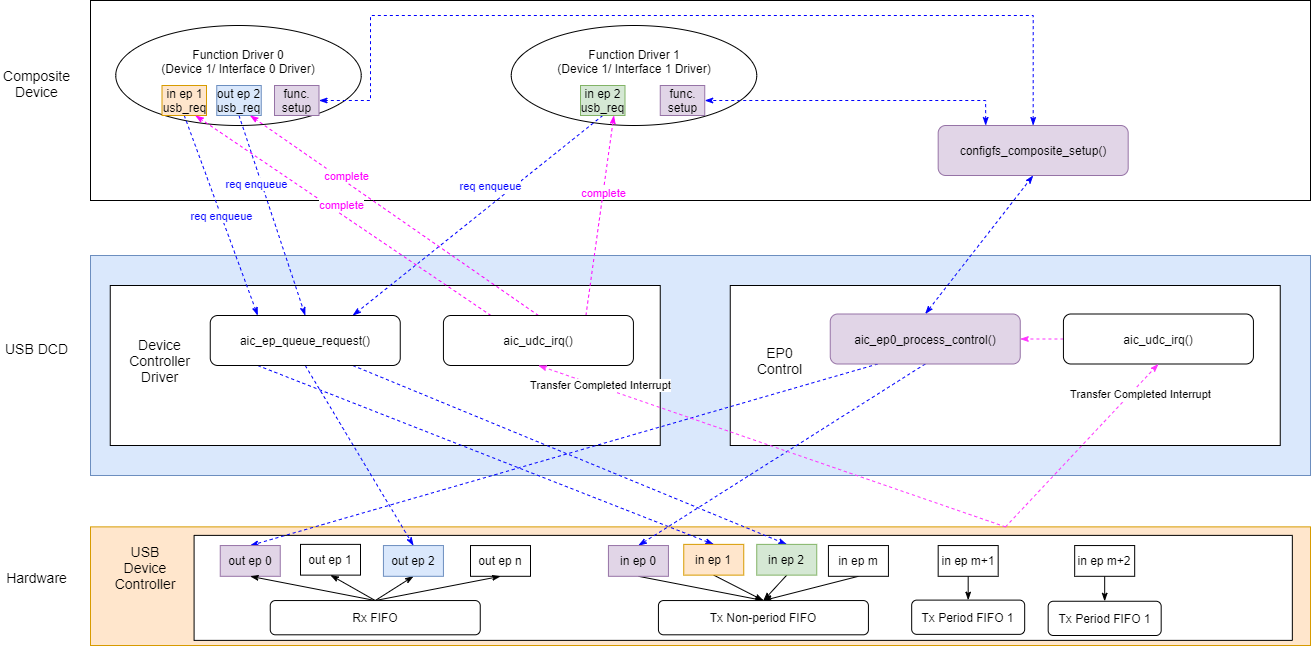
从上述 DCD (Device Controller Driver) 的框架图中可以看到,DCD 主要提供了两大功能:
- 普通 ep 的 usb request 处理。
DCD 提供了一个 endpoint 资源池,Gadget Function Driver 可以在这个资源池中分配需要的 endpoint��,这部分的 endpoint 就称为 普通 ep。
- ep0 的 usb request 处理。
因为 DCD 对外呈现为一个 USB Device,USB Device 的 ep0 是管理通道是需要特殊处理的。对 ep0 传达过来的 control 数据需要在 DCD 层开始解析。
4.2.3. 关键流程
4.2.3.1. 初始化流程
DCD 驱动的入口是 platform 驱动,初始化流程先获取 irq、reg、clk、reset 等资源并进行初始化,最后调用 usb_add_gadget_udc() 向系统中注册。
大致的流程如下:
|-->aic_udc_probe()
    |-->gg->regs = devm_ioremap_resource(&dev->dev, res);
    |-->gg->reset = devm_reset_control_get_optional(gg->dev, "aicudc");
    |-->gg->reset_ecc = devm_reset_control_get_optional_shared(gg->dev,"aicudc-ecc");
    |-->gg->clks[i] = of_clk_get(gg->dev->of_node, i);
    |-->aic_gadget_init(gg);
        |-->aic_low_hw_enable()
            |-->clk_prepare_enable(gg->clks[i]);
            |-->reset_control_deassert(gg->reset);
            |-->reset_control_deassert(gg->reset_ecc);
    |-->res = platform_get_resource(dev, IORESOURCE_IRQ, 0);
    |-->gg->irq = res->start;
    |-->usb_add_gadget_udc(gg->dev, &gg->gadget);
4.2.3.2. ep 分配流程
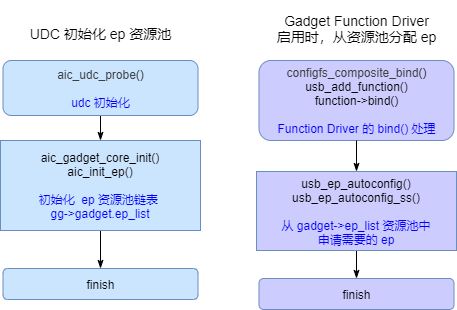
如上图所示,ep 资源的操作分为两部分:
- ep 资源池初始化。在 udc 驱动初始化的时候同时初始化了 ep 资源池,这样就决定了当前有多少个 ep 资源可用。
- ep 资源的分配。gadget composite device 可以配置多个 interface 即 gadget function driver,当 function driver 启用时,会从资源池中分配需要的 ep。如果配置的 function driver 过多,就可能会分配失败。
4.2.3.3. 普通 ep 的 request 处理
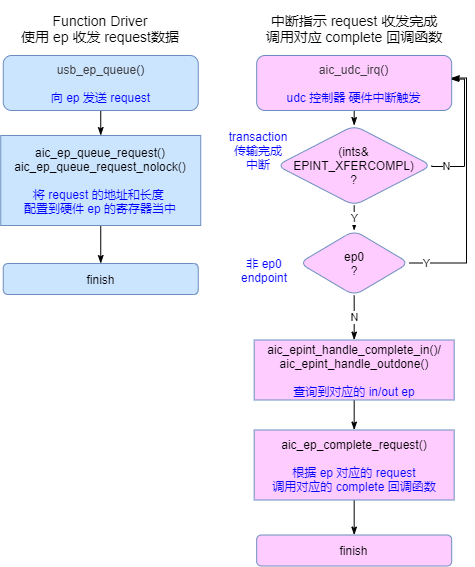
如上图所示,对于普通 ep 的 reuqest 数据收发分为两步:
- request enqueue。首先调用 udc 的
.queue()函数,将需要传输的数据插入到硬件控制器对应的 ep 寄存器当中。 - complete callback。ep 数据收发完成会产生
transfer complete中断,在中断服务程序中调用complete回调函数,结束整个 request 传输。
4.2.3.4. ep0 的 request 处理
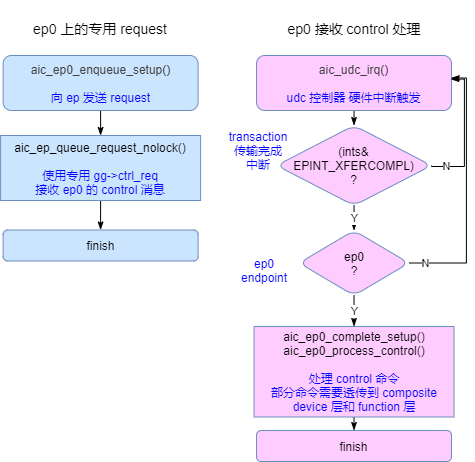
如上图所示,对于 ep0 的 reuqest 数据收发和 普通 ep 基本一样,只是对数据的回调处理稍有不同。
4.2.4. 数据结构
4.2.4.1. aic_usb_ep_ops
AIC UDC 驱动核心的数据结构为 usb_ep_ops, 实现了 op 操作的相关函数:
static const struct usb_ep_ops aic_usb_ep_ops = {
    .enable                 = aic_ep_enable,
    .disable                = aic_ep_disable,
    .alloc_request          = aic_ep_alloc_request,
    .free_request           = aic_ep_free_request,
    .queue                  = aic_ep_queue_request,
    .dequeue                = aic_ep_dequeue_request,
    .set_halt               = aic_ep_sethalt,
};
4.2.5. 接口设计
4.2.5.1. aic_ep_queue_request
| 函数原型 | int aic_ep_queue_request(struct usb_ep *ep, struct usb_request *req, gfp_t gfp_flags) |
|---|---|
| 功能说明 | 接收上层传入的 request,并将其配置到 ep 寄存器中。 |
| 参数定义 | ep:当前 ep 控制结构 req:当前 request 控制结构 gfp_flags:分配内存时使用的标志 |
| 返回值 | 0,成功; < 0,失败 |
| 注意事项 |
4.2.5.2. aic_ep0_process_control
| 函数原型 | void aic_ep0_process_control(struct aic_usb_gadget *gg, struct usb_ctrlrequest *ctrl) |
|---|---|
| 功能说明 | 处理 ep0 接收到的 control 数据包。 |
| 参数定义 | gg:当前 gadget 控制结构 ctrl:当前 control 数据包 |
| 返回值 | 0,成功; < 0,失败 |
| 注意事项 |
5. USB Host 子系统代码架构
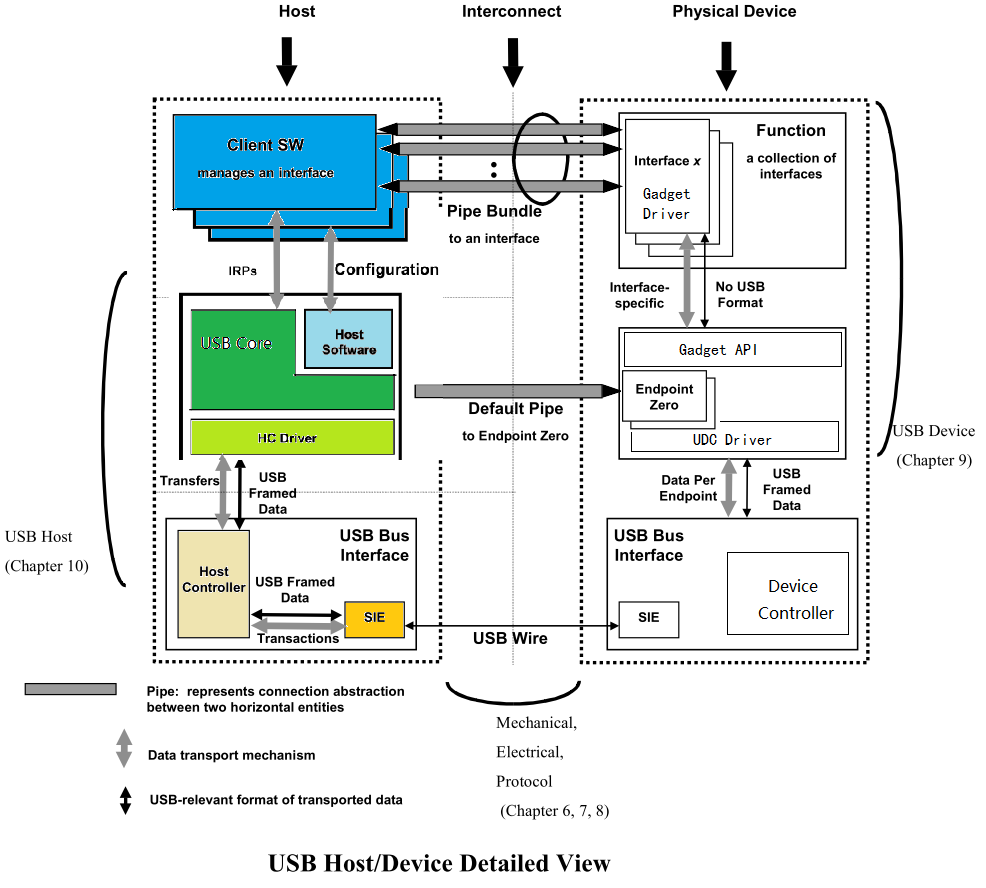
整个 USB 系统的通讯模型如上图所示,Host 框架见左侧彩图部分。
5.1. USB Core
5.1.1. Layer
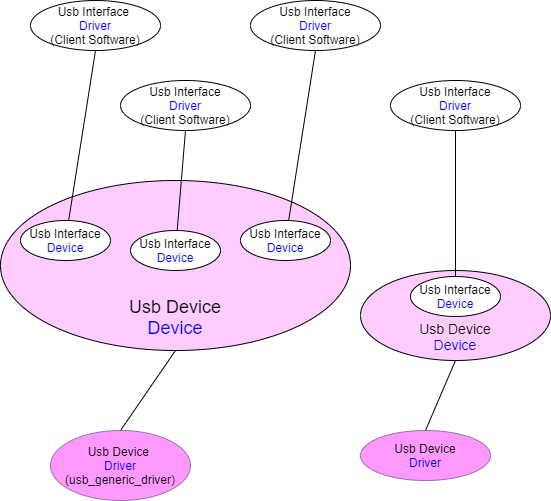
由前几节可知USB将 Device 进一步细分成了3个层级: Configuration 配置、 Interface 接口、 Endpoint 端点。
USB Core 为其中两个层次提供了 Device + Driver 的设备驱动模型,这两个层次分别是 USB Device Layer 和 USB Interface Layer 层,一个 USB Device 包含一个或多个 USB Interface。其中:
USB Device Layer层。这一层的Device由Hub创建,Hub本身也是一种USB Device;这一层的Driver完成的功能非常简单,基本就是帮USB Device创建其包含的所有子USB Interface的Device,大部分场景下都是使用usb_generic_driver。USB Interface Layer层。这一层的Device由上一级USB Device在驱动 probe() 时创建;而这一层的Driver就是普通的业务 Usb 驱动,即 Usb 协议中所说的Client Software。
5.1.2. URB (USB Request Block)
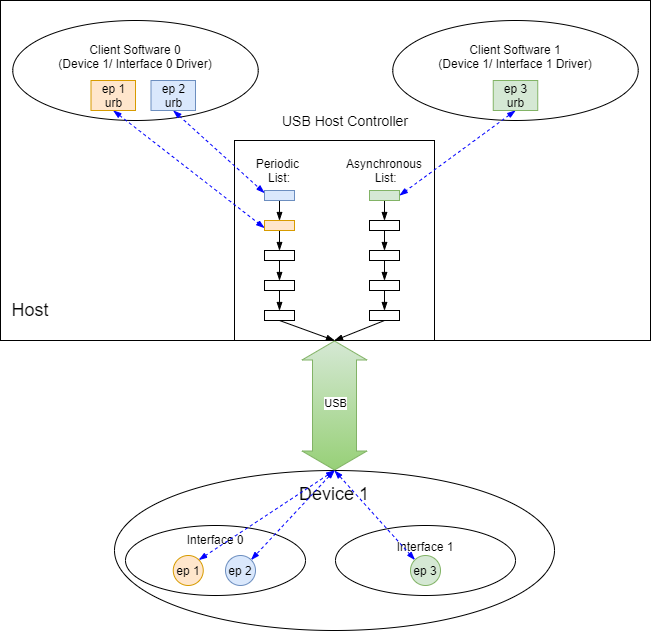
USB Core 除了提供上一节描述的设备驱动模型以外,另一个重要的作用就是要给 USB Interface Driver 提供读写 USB 数据的 API,这一任务是围绕着 USB Request Block 来完成的。
USB Interface Driver 适配成功以后,会从配置信息中获取到当前 Interface 包含了多少个 Endpoint ,以及每个 Endpoint 的地址、传输类型、最大包长等其他信息。 Endpoint 是 USB 总线传输中最小的 寻址单位 ,Interface Driver 利用对几个 Endpoint 的读写来驱动具体的设备功能。
对某个 Endpoint 发��起一次读写操作,具体工作使用 struct urb 数据结构来承担。
以下是一个对 Endpoint 0 使用 urb 发起读写的一个简单实例:
static int usb_internal_control_msg(struct usb_device *usb_dev,
                    unsigned int pipe,
                    struct usb_ctrlrequest *cmd,
                    void *data, int len, int timeout)
{
    struct urb *urb;
    int retv;
    int length;

    /* (1) 分配一个 urb 内存空间 */
    urb = usb_alloc_urb(0, GFP_NOIO);
    if (!urb)
        return -ENOMEM;

    /* (2) 填充 urb 内容,最核心的有3方面:
            1、总线地址:Device Num + Endpoint Num
            2、数据:data + len
            3、回调函数:usb_api_blocking_completion
    */
    usb_fill_control_urb(urb, usb_dev, pipe, (unsigned char *)cmd, data,
                len, usb_api_blocking_completion, NULL);

    /* (3) 发送 urb 请求,并且等待请求完成 */
    retv = usb_start_wait_urb(urb, timeout, &length);
    if (retv < 0)
        return retv;
    else
        return length;
}

↓

static int usb_start_wait_urb(struct urb *urb, int timeout, int *actual_length)
{
    struct api_context ctx;
    unsigned long expire;
    int retval;

    init_completion(&ctx.done);
    urb->context = &ctx;
    urb->actual_length = 0;
    /* (3.1) 把 urb 请求挂载到 hcd 的队列当中 */
    retval = usb_submit_urb(urb, GFP_NOIO);
    if (unlikely(retval))
        goto out;

    expire = timeout ? msecs_to_jiffies(timeout) : MAX_SCHEDULE_TIMEOUT;
    /* (3.2) 当 urb 执行完成后,首先会调用 urb 的回调函数,然后会发送 completion 信号解除这里的阻塞 */
    if (!wait_for_completion_timeout(&ctx.done, expire)) {
        usb_kill_urb(urb);
        retval = (ctx.status == -ENOENT ? -ETIMEDOUT : ctx.status);

        dev_dbg(&urb->dev->dev,
            "%s timed out on ep%d%s len=%u/%u\n",
            current->comm,
            usb_endpoint_num(&urb->ep->desc),
            usb_urb_dir_in(urb) ? "in" : "out",
            urb->actual_length,
            urb->transfer_buffer_length);
    } else
        retval = ctx.status;
out:
    if (actual_length)
        *actual_length = urb->actual_length;

    usb_free_urb(urb);
    return retval;
}
5.1.2.1. Normal Device urb_enqueue
对普通的 Usb device 来说,urb 最后会提交到 Host Controller 的收发队列上面,由 HC 完成实际的 USB 传输:
usb_submit_urb() → usb_hcd_submit_urb():

int usb_hcd_submit_urb (struct urb *urb, gfp_t mem_flags)
{

    /* (1) 如果是 roothub 走特殊的路径 */
    if (is_root_hub(urb->dev)) {
        status = rh_urb_enqueue(hcd, urb);
    /* (2) 如果是普通 device 调用对应的 hcd 的 urb_enqueue() 函数 */
    } else {
        status = map_urb_for_dma(hcd, urb, mem_flags);
        if (likely(status == 0)) {
            status = hcd->driver->urb_enqueue(hcd, urb, mem_flags);
            if (unlikely(status))
                unmap_urb_for_dma(hcd, urb);
        }
    }

}
5.1.2.2. Roothub Device urb_enqueue
特别需要注意的是 roothub 它是一个虚拟的 usb device,实际上它并不在usb总线上而是在 host 内部,所以相应的 urb 需要特殊处理,而不能使用 hcd 把数据发送到 Usb 总线上去。
usb_submit_urb() → usb_hcd_submit_urb() → rh_urb_enqueue():

static int rh_urb_enqueue (struct usb_hcd *hcd, struct urb *urb)
{
    /* (1) 对于 int 类型的数据,被挂载到 hcd->status_urb 指针上面
            通常 roothub 驱动用这个 urb 来查询 roothub 的端口状态
    */
    if (usb_endpoint_xfer_int(&urb->ep->desc))
        return rh_queue_status (hcd, urb);

    /* (2) 对于 control 类型的数据,是想读取 roothub ep0 上的配置信息
            使用软件来模拟这类操作的响应
    */
    if (usb_endpoint_xfer_control(&urb->ep->desc))
        return rh_call_control (hcd, urb);
    return -EINVAL;
}

|→

static int rh_queue_status (struct usb_hcd *hcd, struct urb *urb)
{

    /* (1.1) 将 urb 挂载到对应的 ep 链表中 */
    retval = usb_hcd_link_urb_to_ep(hcd, urb);
    if (retval)
        goto done;

    /* (1.2) 将 urb 赋值给 hcd->status_urb
            在 hcd 驱动中,会通过这些接口来通知 roothub 的端口状态变化
    */
    hcd->status_urb = urb;
    urb->hcpriv = hcd;      /* indicate it's queued */
    if (!hcd->uses_new_polling)
        mod_timer(&hcd->rh_timer, (jiffies/(HZ/4) + 1) * (HZ/4));

}

|→

static int rh_call_control (struct usb_hcd *hcd, struct urb *urb)
{
    /* (2.1) 软件模拟对 roothub 配置读写的响应 */
}
5.2. USB Device Layer
5.2.1. Device (struct usb_device)
USB Device Device 对应的数据结构为 struct usb_device ,会在两种情况下被创建:
- roothub device。在 HCD 驱动注册时创建:
/* (1) 首先创建和初始化 `usb_device` 结构: */
usb_add_hcd() → usb_alloc_dev():
struct usb_device *usb_alloc_dev(struct usb_device *parent,
                struct usb_bus *bus, unsigned port1)
{

    /* (1.1) dev 总线初始化为 usb_bus_type */
    dev->dev.bus = &usb_bus_type;
    /* (1.2) dev 类型初始化为 usb_device_type,标明自己是一个 usb device */
    dev->dev.type = &usb_device_type;
    dev->dev.groups = usb_device_groups;

}

/* (2) 然后注册  `usb_device` 结构: */
usb_add_hcd() → register_root_hub() → usb_new_device() → device_add()
- 普通 usb device。在 Hub 检测到端口有设备 attach 时创建:
/* (1) 首先创建和初始化 `usb_device` 结构: */
hub_event() → port_event() → hub_port_connect_change() → hub_port_connect() → usb_alloc_dev()

/* (2) 然后注册  `usb_device` 结构: */
hub_event() → port_event() → hub_port_connect_change() → hub_port_connect() → usb_new_device() → device_add()
5.2.2. Driver (struct usb_device_driver)
USB Device Driver 对应的数据结构为 struct usb_device_driver,使用 usb_register_device_driver() 函数进行注册:
int usb_register_device_driver(struct usb_device_driver *new_udriver,
        struct module *owner)
{

    /* (1) 设置for_devices标志为1,表面这个驱动时给 usb device 使用的 */
    new_udriver->drvwrap.for_devices = 1;
    new_udriver->drvwrap.driver.name = new_udriver->name;
    new_udriver->drvwrap.driver.bus = &usb_bus_type;
    new_udriver->drvwrap.driver.probe = usb_probe_device;
    new_udriver->drvwrap.driver.remove = usb_unbind_device;
    new_udriver->drvwrap.driver.owner = owner;
    new_udriver->drvwrap.driver.dev_groups = new_udriver->dev_groups;

    retval = driver_register(&new_udriver->drvwrap.driver);

}
注册的 USB Device Driver 驱动非常少,一般情况下所有的 USB Device Device 都会适配到 usb_generic_driver。因为这一层次驱动的目的很单纯,就是给 USB Device 下所有的 Interface 创建对应的 USB Interface Device。
usb_init() → usb_register_device_driver() :

static int __init usb_init(void)
{

    retval = usb_register_device_driver(&usb_generic_driver, THIS_MODULE);

}

struct usb_device_driver usb_generic_driver = {
    .name = "usb",
    .match = usb_generic_driver_match,
    .probe = usb_generic_driver_probe,
    .disconnect = usb_generic_driver_disconnect,
#ifdef      CONFIG_PM
    .suspend = usb_generic_driver_suspend,
    .resume = usb_generic_driver_resume,
#endif
    .supports_autosuspend = 1,
};
驱动 probe() 过程:
usb_probe_device() → usb_generic_driver_probe() → usb_set_configuration():

int usb_set_configuration(struct usb_device *dev, int configuration)
{

    /* (1) 创建和初始化 `struct usb_interface` */
    for (i = 0; i < nintf; ++i) {
        /* (1.1) dev 总线初始化为 usb_bus_type */
        intf->dev.bus = &usb_bus_type;
        /* (1.2) dev 类型初始化为 usb_if_device_type,标明自己是一个 usb interface */
        intf->dev.type = &usb_if_device_type;
        intf->dev.groups = usb_interface_groups;
    }

    /* (2) 注册 `struct usb_interface` */
    for (i = 0; i < nintf; ++i) {
        ret = device_add(&intf->dev);
    }

}
5.2.3. Bus (usb_bus_type)
可以看到 struct usb_device 和 struct usb_interface 使用的总线都是 usb_bus_type。他们是通过字段 dev.type 来区分的:
/* (1) `struct usb_device` 的 `dev.type` 值为 `usb_device_type`: */
usb_add_hcd() → usb_alloc_dev():
struct usb_device *usb_alloc_dev(struct usb_device *parent,
                struct usb_bus *bus, unsigned port1)
{
    dev->dev.type = &usb_device_type;
}

/* (2) `struct usb_interface` 的 `dev.type` 值为 `usb_if_device_type` */
usb_probe_device() → usb_generic_driver_probe() → usb_set_configuration():
int usb_set_configuration(struct usb_device *dev, int configuration)
{
    for (i = 0; i < nintf; ++i) {
        intf->dev.type = &usb_if_device_type;
    }
}

static inline int is_usb_device(const struct device *dev)
{
    /* (3) 判断当前 Device 是否为 Usb Device */
    return dev->type == &usb_device_type;
}

static inline int is_usb_interface(const struct device *dev)
{
    /* (4) 判断当前 Device 是否为 Usb Interface */
    return dev->type == &usb_if_device_type;
}
另外 struct usb_device_driver 和 struct usb_driver 使用的总线都是 usb_bus_type。他们是通过字段 drvwrap.for_devices 来区分的:
/* (1) `struct usb_device_driver` 的 `drvwrap.for_devices` 值为 1: */
int usb_register_device_driver(struct usb_device_driver *new_udriver,
        struct module *owner)
{
    new_udriver->drvwrap.for_devices = 1;
}

/* (2) `struct usb_driver` 的 `drvwrap.for_devices` 值为 0: */
int usb_register_driver(struct usb_driver *new_driver, struct module *owner,
            const char *mod_name)
{
    new_driver->drvwrap.for_devices = 0;
}

/* (3) 判断当前 Driver 是适配 Usb Device 还是 Usb Interface */
static inline int is_usb_device_driver(struct device_driver *drv)
{
    return container_of(drv, struct usbdrv_wrap, driver)->
            for_devices;
}
在 usb_bus_type 的 match() 函数中利用 dev.type 进行判别分开处理:
struct bus_type usb_bus_type = {
    .name =         "usb",
    .match =        usb_device_match,
    .uevent =       usb_uevent,
    .need_parent_lock =     true,
};

static int usb_device_match(struct device *dev, struct device_driver *drv)
{
    /* devices and interfaces are handled separately */
    /* (1) Device 是 `Usb Device` 的处理 */
    if (is_usb_device(dev)) {
        struct usb_device *udev;
        struct usb_device_driver *udrv;

        /* interface drivers never match devices */
        /* (1.1) 只查找 `Usb Device` 的 Driver */
        if (!is_usb_device_driver(drv))
            return 0;

        udev = to_usb_device(dev);
        udrv = to_usb_device_driver(drv);

        /* If the device driver under consideration does not have a
        * id_table or a match function, then let the driver's probe
        * function decide.
        */
        if (!udrv->id_table && !udrv->match)
            return 1;

        return usb_driver_applicable(udev, udrv);

    /* (2) Device 是 `Usb Interface` 的处理 */
    } else if (is_usb_interface(dev)) {
        struct usb_interface *intf;
        struct usb_driver *usb_drv;
        const struct usb_device_id *id;

        /* device drivers never match interfaces */
        /* (2.1) 只查找 `Usb Interface` 的 Driver */
        if (is_usb_device_driver(drv))
            return 0;

        intf = to_usb_interface(dev);
        usb_drv = to_usb_driver(drv);

        id = usb_match_id(intf, usb_drv->id_table);
        if (id)
            return 1;

        id = usb_match_dynamic_id(intf, usb_drv);
        if (id)
            return 1;
    }

    return 0;
}
5.3. USB Interface Layer
5.3.1. Device (struct usb_interface)
如上一节描述, USB Interface Device 对应的数据结构为 struct usb_interface ,会在 USB Device Driver 驱动 probe() 时 被创建:
usb_probe_device() → usb_generic_driver_probe() → usb_set_configuration():

int usb_set_configuration(struct usb_device *dev, int configuration)
{

    /* (1) 创建和初始化 `struct usb_interface` */
    for (i = 0; i < nintf; ++i) {
        /* (1.1) dev 总线初始化为 usb_bus_type */
        intf->dev.bus = &usb_bus_type;
        /* (1.2) dev 类型初始化为 usb_if_device_type,标明自己是一个 usb interface */
        intf->dev.type = &usb_if_device_type;
        intf->dev.groups = usb_interface_groups;
    }

    /* (2) 注册 `struct usb_interface` */
    for (i = 0; i < nintf; ++i) {
        ret = device_add(&intf->dev);
    }

}
5.3.2. Driver (struct usb_driver)
USB Interface 这一层次的驱动就非常的多了,这一层主要是在 USB 传输层之上,针对 USB Device 的某个功能 Function 开发对应的 USB 功能业务驱动,即常说的 USB Client Software。在 USB 定义中,一个 Interface 就是一个 Function。
USB Interface Driver 对应的数据结构为 struct usb_driver ,使用 usb_register_driver() 函数进行注册:
int usb_register_driver(struct usb_driver *new_driver, struct module *owner,
            const char *mod_name)
{

    /* (1) 设置for_devices标志为0,表面这个驱动时给 usb interface 使用的 */
    new_driver->drvwrap.for_devices = 0;
    new_driver->drvwrap.driver.name = new_driver->name;
    new_driver->drvwrap.driver.bus = &usb_bus_type;
    new_driver->drvwrap.driver.probe = usb_probe_interface;
    new_driver->drvwrap.driver.remove = usb_unbind_interface;
    new_driver->drvwrap.driver.owner = owner;
    new_driver->drvwrap.driver.mod_name = mod_name;
    new_driver->drvwrap.driver.dev_groups = new_driver->dev_groups;
    spin_lock_init(&new_driver->dynids.lock);
    INIT_LIST_HEAD(&new_driver->dynids.list);

    retval = driver_register(&new_driver->drvwrap.driver);

}
一个最简单的 Usb Interface Driver 是 usb_mouse_driver :
static const struct usb_device_id usb_mouse_id_table[] = {
    { USB_INTERFACE_INFO(USB_INTERFACE_CLASS_HID, USB_INTERFACE_SUBCLASS_BOOT,
        USB_INTERFACE_PROTOCOL_MOUSE) },
    { }     /* Terminating entry */
};
MODULE_DEVICE_TABLE (usb, usb_mouse_id_table);

static struct usb_driver usb_mouse_driver = {
    .name           = "usbmouse",
    .probe          = usb_mouse_probe,
    .disconnect     = usb_mouse_disconnect,
    .id_table       = usb_mouse_id_table,
};

module_usb_driver(usb_mouse_driver);
- 首先根据得到的 endpoint 准备好 urb,创建好 input 设备:
static int usb_mouse_probe(struct usb_interface *intf, const struct usb_device_id *id)
{
    struct usb_device *dev = interface_to_usbdev(intf);
    struct usb_host_interface *interface;
    struct usb_endpoint_descriptor *endpoint;
    struct usb_mouse *mouse;
    struct input_dev *input_dev;
    int pipe, maxp;
    int error = -ENOMEM;

    interface = intf->cur_altsetting;

    if (interface->desc.bNumEndpoints != 1)
        return -ENODEV;

    /* (1) 得到当前 interface 中的第一个 endpoint,mouse设备只需一个 endpoint */
    endpoint = &interface->endpoint[0].desc;
    if (!usb_endpoint_is_int_in(endpoint))
        return -ENODEV;

    pipe = usb_rcvintpipe(dev, endpoint->bEndpointAddress);
    maxp = usb_maxpacket(dev, pipe, usb_pipeout(pipe));

    mouse = kzalloc(sizeof(struct usb_mouse), GFP_KERNEL);
    /* (2.1) 分配 input device */
    input_dev = input_allocate_device();
    if (!mouse || !input_dev)
        goto fail1;

    mouse->data = usb_alloc_coherent(dev, 8, GFP_ATOMIC, &mouse->data_dma);
    if (!mouse->data)
        goto fail1;

    /* (3.1) 分配 urb */
    mouse->irq = usb_alloc_urb(0, GFP_KERNEL);
    if (!mouse->irq)
        goto fail2;

    mouse->usbdev = dev;
    mouse->dev = input_dev;

    if (dev->manufacturer)
        strlcpy(mouse->name, dev->manufacturer, sizeof(mouse->name));

    if (dev->product) {
        if (dev->manufacturer)
            strlcat(mouse->name, " ", sizeof(mouse->name));
        strlcat(mouse->name, dev->product, sizeof(mouse->name));
    }

    if (!strlen(mouse->name))
        snprintf(mouse->name, sizeof(mouse->name),
            "USB HIDBP Mouse %04x:%04x",
            le16_to_cpu(dev->descriptor.idVendor),
            le16_to_cpu(dev->descriptor.idProduct));

    usb_make_path(dev, mouse->phys, sizeof(mouse->phys));
    strlcat(mouse->phys, "/input0", sizeof(mouse->phys));

    /* (2.2) 初始化 input device */
    input_dev->name = mouse->name;
    input_dev->phys = mouse->phys;
    usb_to_input_id(dev, &input_dev->id);
    input_dev->dev.parent = &intf->dev;

    input_dev->evbit[0] = BIT_MASK(EV_KEY) | BIT_MASK(EV_REL);
    input_dev->keybit[BIT_WORD(BTN_MOUSE)] = BIT_MASK(BTN_LEFT) |
        BIT_MASK(BTN_RIGHT) | BIT_MASK(BTN_MIDDLE);
    input_dev->relbit[0] = BIT_MASK(REL_X) | BIT_MASK(REL_Y);
    input_dev->keybit[BIT_WORD(BTN_MOUSE)] |= BIT_MASK(BTN_SIDE) |
        BIT_MASK(BTN_EXTRA);
    input_dev->relbit[0] |= BIT_MASK(REL_WHEEL);

    input_set_drvdata(input_dev, mouse);

    input_dev->open = usb_mouse_open;
    input_dev->close = usb_mouse_close;

    /* (3.2) 初始化 urb */
    usb_fill_int_urb(mouse->irq, dev, pipe, mouse->data,
            (maxp > 8 ? 8 : maxp),
            usb_mouse_irq, mouse, endpoint->bInterval);
    mouse->irq->transfer_dma = mouse->data_dma;
    mouse->irq->transfer_flags |= URB_NO_TRANSFER_DMA_MAP;

    /* (2.3) 注册 input device */
    error = input_register_device(mouse->dev);
    if (error)
        goto fail3;

    usb_set_intfdata(intf, mouse);
    return 0;

fail3:
    usb_free_urb(mouse->irq);
fail2:
    usb_free_coherent(dev, 8, mouse->data, mouse->data_dma);
fail1:
    input_free_device(input_dev);
    kfree(mouse);
    return error;
}
- 在 input device 被 open 时提交 urb 启动传输:
static int usb_mouse_open(struct input_dev *dev)
{
    struct usb_mouse *mouse = input_get_drvdata(dev);

    mouse->irq->dev = mouse->usbdev;
    /* (1) 提交初始化好的 usb,开始查询数据 */
    if (usb_submit_urb(mouse->irq, GFP_KERNEL))
        return -EIO;

    return 0;
}
- 在传输完 urb 的回调函数中,根据读回的数据上报 input 事件,并且重新提交 urb 继续查询:
static void usb_mouse_irq(struct urb *urb)
{
    struct usb_mouse *mouse = urb->context;
    signed char *data = mouse->data;
    struct input_dev *dev = mouse->dev;
    int status;

    switch (urb->status) {
    case 0:                 /* success */
        break;
    case -ECONNRESET:       /* unlink */
    case -ENOENT:
    case -ESHUTDOWN:
        return;
    /* -EPIPE:  should clear the halt */
    default:                /* error */
        goto resubmit;
    }

    /* (1) 根据 urb 读回的数据,上报 input event */
    input_report_key(dev, BTN_LEFT,   data[0] & 0x01);
    input_report_key(dev, BTN_RIGHT,  data[0] & 0x02);
    input_report_key(dev, BTN_MIDDLE, data[0] & 0x04);
    input_report_key(dev, BTN_SIDE,   data[0] & 0x08);
    input_report_key(dev, BTN_EXTRA,  data[0] & 0x10);

    input_report_rel(dev, REL_X,     data[1]);
    input_report_rel(dev, REL_Y,     data[2]);
    input_report_rel(dev, REL_WHEEL, data[3]);

    input_sync(dev);
resubmit:
    /* (2) 重新提交 urb 继续查询 */
    status = usb_submit_urb (urb, GFP_ATOMIC);
    if (status)
        dev_err(&mouse->usbdev->dev,
            "can't resubmit intr, %s-%s/input0, status %d\n",
            mouse->usbdev->bus->bus_name,
            mouse->usbdev->devpath, status);
}
5.3.3. USB Hub Driver
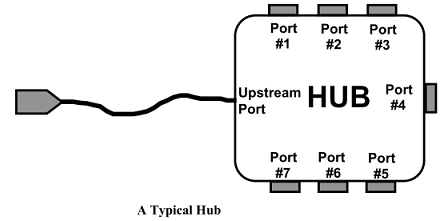
普通的 Usb Device 通过内部的 Interface 提供各种业务功能。而 Hub 这类特殊的 Usb Device 功能就一种,那就是监控端口的状态变化:
- 在端口上有设备 attach 时,创建新的 usb device,给其适配驱动。如果是 hub device,子 usb 驱动会进一步扫描端口。
- 在端口上有设备 deattach 时,移除掉对应的 usb device。如果是 hub device 进一步移除其所有的子 usb device。
Hub 也是标准的 Usb Device,它也是标准的流程被上一级设备发现后 创建 Usb Device → 创建 Usb Interface ,然后被 Usb Hub Interface Driver 给适配到。系统中只有一个 Hub 驱动:
static const struct usb_device_id hub_id_table[] = {
    { .match_flags = USB_DEVICE_ID_MATCH_VENDOR
                | USB_DEVICE_ID_MATCH_PRODUCT
                | USB_DEVICE_ID_MATCH_INT_CLASS,
    .idVendor = USB_VENDOR_SMSC,
    .idProduct = USB_PRODUCT_USB5534B,
    .bInterfaceClass = USB_CLASS_HUB,
    .driver_info = HUB_QUIRK_DISABLE_AUTOSUSPEND},
    { .match_flags = USB_DEVICE_ID_MATCH_VENDOR
            | USB_DEVICE_ID_MATCH_INT_CLASS,
    .idVendor = USB_VENDOR_GENESYS_LOGIC,
    .bInterfaceClass = USB_CLASS_HUB,
    .driver_info = HUB_QUIRK_CHECK_PORT_AUTOSUSPEND},
    { .match_flags = USB_DEVICE_ID_MATCH_DEV_CLASS,
    .bDeviceClass = USB_CLASS_HUB},
    { .match_flags = USB_DEVICE_ID_MATCH_INT_CLASS,
    .bInterfaceClass = USB_CLASS_HUB},
    { }                                             /* Terminating entry */
};

MODULE_DEVICE_TABLE(usb, hub_id_table);

static struct usb_driver hub_driver = {
    .name =         "hub",
    .probe =        hub_probe,
    .disconnect =   hub_disconnect,
    .suspend =      hub_suspend,
    .resume =       hub_resume,
    .reset_resume = hub_reset_resume,
    .pre_reset =    hub_pre_reset,
    .post_reset =   hub_post_reset,
    .unlocked_ioctl = hub_ioctl,
    .id_table =     hub_id_table,
    .supports_autosuspend = 1,
};
hub_driver 驱动启动以后,只做一件事情发送一个查询端口状态的 urb :
hub_probe() → hub_configure():

static int hub_configure(struct usb_hub *hub,
    struct usb_endpoint_descriptor *endpoint)
{

    /* (1) 分配 urb */
    hub->urb = usb_alloc_urb(0, GFP_KERNEL);
    if (!hub->urb) {
        ret = -ENOMEM;
        goto fail;
    }

    /* (2) 初始化 urb,作用就是通过 ep0 查询 hub 的端口状态
            urb 的回调函数是 hub_irq()
    */
    usb_fill_int_urb(hub->urb, hdev, pipe, *hub->buffer, maxp, hub_irq,
        hub, endpoint->bInterval);

    /* (3) 发送 urb */
    hub_activate(hub, HUB_INIT);

}

↓

static void hub_activate(struct usb_hub *hub, enum hub_activation_type type)
{
    /*  (3.1) 提交 urb */
    status = usb_submit_urb(hub->urb, GFP_NOIO);
}
5.3.3.1. Normal Hub Port op
在普通的 hub 中,端口操��作是通过标准的 urb 发起 usb ep0 读写。分为两类:
- 通过轮询读取 Hub Class-specific Requests 配置来查询端口的状态:

- 设置和使能端口也是通过 Hub Class-specific Requests 中相应的命令实现的:
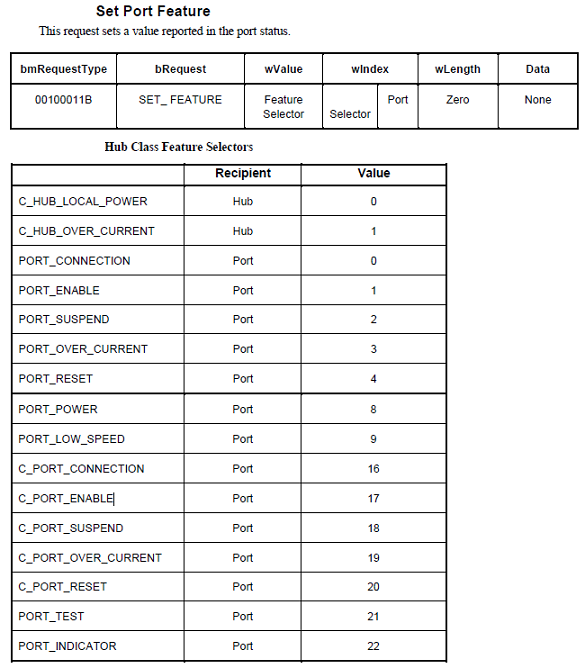
5.3.3.2. RootHub Port op
而对于 roothub 来说,对端口的操作的 urb 都需要特殊处理 (以 EHCI 的驱动为例):
- 端口状态的变化可以通过 HCD 触发中断再上报:
ehci_irq() → usb_hcd_poll_rh_status() :

void usb_hcd_poll_rh_status(struct usb_hcd *hcd)
{

    /* (1) 获取端口状态的变化 */
    length = hcd->driver->hub_status_data(hcd, buffer);
    if (length > 0) {

        /* try to complete the status urb */
        spin_lock_irqsave(&hcd_root_hub_lock, flags);

        /* (2) 通过回复 hcd->status_urb 来进行上报 */
        urb = hcd->status_urb;
        if (urb) {
            clear_bit(HCD_FLAG_POLL_PENDING, &hcd->flags);
            hcd->status_urb = NULL;
            urb->actual_length = length;
            memcpy(urb->transfer_buffer, buffer, length);

            usb_hcd_unlink_urb_from_ep(hcd, urb);
            usb_hcd_giveback_urb(hcd, urb, 0);
        } else {
            length = 0;
            set_bit(HCD_FLAG_POLL_PENDING, &hcd->flags);
        }
        spin_unlock_irqrestore(&hcd_root_hub_lock, flags);
    }

}

↓

hcd->driver->hub_status_data() → ehci_hub_status_data():

static int
ehci_hub_status_data (struct usb_hcd *hcd, char *buf)
{
    /* (1.1) 通过 HCD 驱动,获取 roothub 端口的状态 */
}
- 设置和使能端口需要嫁接到 HCD 驱动相关函数上实现:
usb_hcd_submit_urb() → rh_urb_enqueue() → rh_call_control() → hcd->driver->hub_control() → ehci_hub_control():

int ehci_hub_control(
    struct usb_hcd  *hcd,
    u16             typeReq,
    u16             wValue,
    u16             wIndex,
    char            *buf,
    u16             wLength
) {
    /* (1) 通过 HCD 驱动,设置 roothub 的端口 */
}
5.3.3.3. Device Attach
hub_event() → port_event() → hub_port_connect_change() → hub_port_connect():

static void hub_port_connect(struct usb_hub *hub, int port1, u16 portstatus,
        u16 portchange)
{

    for (i = 0; i < PORT_INIT_TRIES; i++) {

        /* (1) 给端口上新 Device 分配 `struct usb_device` 数据结构 */
        udev = usb_alloc_dev(hdev, hdev->bus, port1);
        if (!udev) {
            dev_err(&port_dev->dev,
                    "couldn't allocate usb_device\n");
            goto done;
        }

        /* (2) 给新的 Device 分配一个新的 Address */
        choose_devnum(udev);
        if (udev->devnum <= 0) {
            status = -ENOTCONN;     /* Don't retry */
            goto loop;
        }

        /* reset (non-USB 3.0 devices) and get descriptor */
        usb_lock_port(port_dev);
        /* (3) 使能端口,并且调用 hub_set_address() 给 Device 配置上新分配的 Address */
        status = hub_port_init(hub, udev, port1, i);
        usb_unlock_port(port_dev);

        /* (4) 注册 `struct usb_device` */
            status = usb_new_device(udev);

    }

}
5.3.3.4. Device Deattach
hub_event() → port_event() → hub_port_connect_change() → hub_port_connect():

static void hub_port_connect(struct usb_hub *hub, int port1, u16 portstatus,
        u16 portchange)
{

    /* (1) 移除端口上的 `struct usb_device` */
    if (udev) {
        if (hcd->usb_phy && !hdev->parent)
            usb_phy_notify_disconnect(hcd->usb_phy, udev->speed);
        usb_disconnect(&port_dev->child);
    }

}
5.3.4. Bus (usb_bus_type)
USB Interface 这一层次总线也是 usb_bus_type ,上一节已经分析,这里就不重复解析了。
5.4. USB Host Controller Layer
Usb Host Controller 提供了 endpoint 层级的数据收发,主要分为以下种类:
- Usb1.0 有两种控制器标准:
OHCI康柏的开放主机控制器接口,UHCIIntel 的通用主机控制器接口。它们的主要区别是 UHCI 更加依赖软件驱动,因此对 CPU 要求更高,但是自身的硬件会更廉价。 - Usb2.0 只有一种控制器标准:
EHCI。因为EHCI只支持高速传输,所以EHCI控制器包括四个虚拟的全速或者慢速控制器。EHCI主要用于 USB 2.0,老的 USB 1.1 用OHCI和UHCI。EHCI为了兼容 USB 1.1,将老的OHCI和UHCI合并到EHCI规范里。 - USB 3.0 控制器标准:
XHCI。XHCI是 Intel 最新开发的主机控制器接口,广泛用户 Intel 六代 Skylake 处理器对应的 100 系列主板上,支持 USB3.0 接口,往下也兼容 USB2.0 。 XHCI 英文全称eXtensible Host Controller Interface,是一种可扩展的主机控制器接口,是 Intel 开发的 USB 主机控制器。Intel 系列芯片的 USB 协议采用的就是XHCI主控,主要面向 USB 3.0 标准的,同时也兼容 2.0 以下的设备。
5.4.1. AIC USB Host Controller
ArtinChip 提供了兼容标准 EHCI 的 USB Host Controller。
EHCI 只支持 USB 2.0 高速传输,为了向下兼容 USB 1.1,它直接在内部集成最多4个全速或者慢速控制器 OHCI。在 EHCI 协议内称这种伴生的 OHCI 控制器为 companion host controllers。
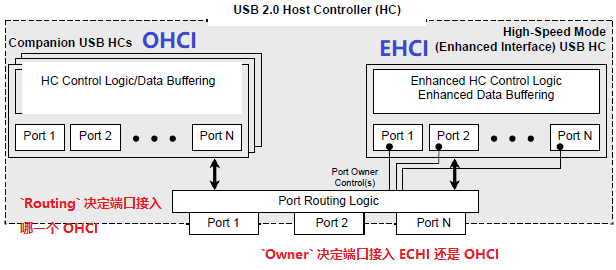
由 EHCI 驱动根据端口速率情况来决定由谁来处理:
- 每个端口有一个
Owner属性,用来决定是EHCI管理还是OHCI管理。就是一个Switch开关,决定 USB 数据切到哪边处理。 - 初始状态时端口默认属于
OHCI管理。所以对于硬件上从OHCI升级到EHCI,而软件上只有OHCI驱动而没有EHCI驱动的系统来说是透明的,它继续把EHCI当成OHCI硬件来使用就行了,保持完美的向前兼容。 - 如果系统软件上启用了
EHCI驱动,它首先会把所有端口的Owner配置成EHCI管理。如果EHCI驱动发现端口连接且速率是全速或者慢速,则把端口的Owner配置成OHCI管理。
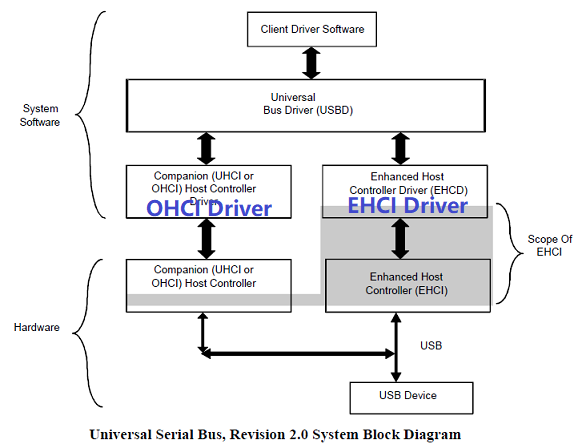
对于 EHCI 这种包含两种控制器的兼容方式,软件上需要同时启动 EHCI Driver 和 OHCI Driver,才能完整的兼容 USB 1.0 和 USB 2.0:
5.4.2. EHCI 内部结构
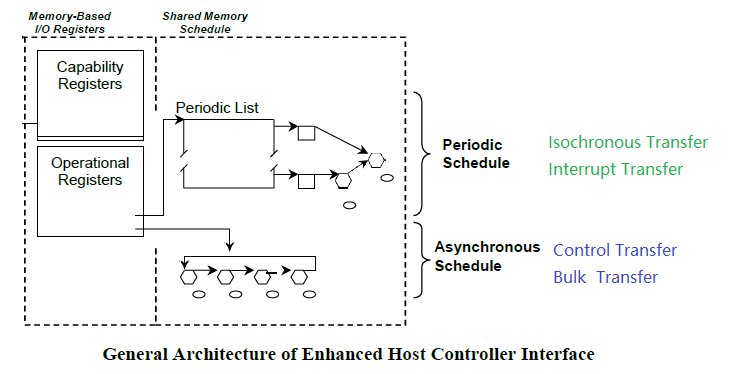
EHCI 的核心就是把数据传输分成了两类来进行调度:
Asynchronous Schedule。用来传输对时间延迟要求不高的 Endpoint 数据,包括Control Transfer和Bulk Transfer。Periodic Schedule。用来传输对时间延迟要求高的 Endpoint 数据,包括Isochronous Transfer和Interrupt Transfer。
5.4.2.1. Asynchronous Queue Schedule
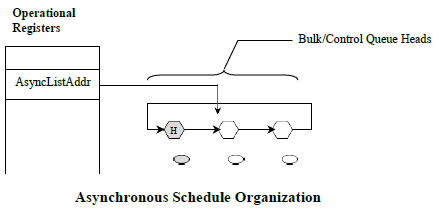
Asynchronous Schedule 内部实现非常的简单就只有一级链表,链表中只有 Queue Head 类型的描述符。每个时间片内传输完 Period 数据以后,再尽可能的传输 Asynchronous 数据即可。
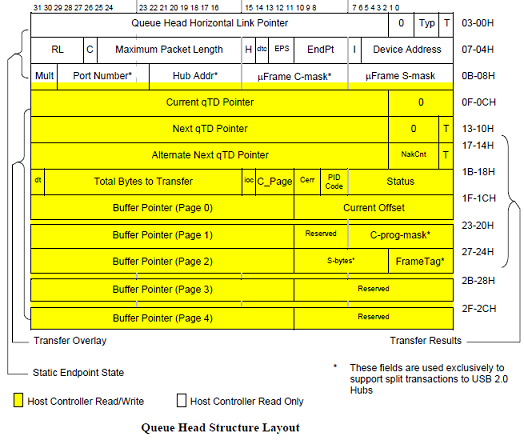
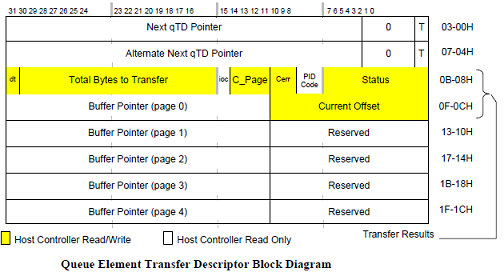
核心的描述符如下:
- Queue Head
- Queue Element Transfer Descriptor (qTD)
5.4.2.2. Periodic Queue Schedule
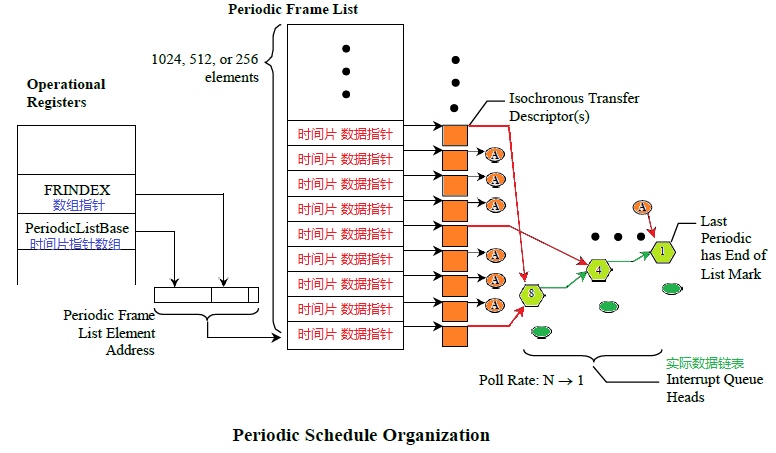
Periodic Schedule 内部实现如上图所示,核心是两级链表:
- 第一级链表如上图
绿色所示。是各种传输结构的实际描述符,主要包含以下几种类型的描述符:

- 第二级链表如上图
橙色所示。是一个指针数组,数组中保存的是指向第一级链表的指针。这里每个数组成员代表一个时间分片 Frame/Micro-Frame 的起始位置,每个时间片会根据指针传输第一级链表中的数据,直到第一级链表的结尾。指针的格式如下:

注解
这里的调度思想就是:第一级链表是一个传输数据全集,第二级链表决定了某个时间片里要传输的数据。
这样合理的安排二级链表的指针,比如间隔 8 次指向同一位置这部分数据的 interval 就是 8,间隔 4 次指向同一位置这部分数据的 interval 就是 4。 第一级链表也是要根据 interval 排序的。
Periodic Schedule 核心的描述符除了 QH、QTD 还有 ITD:
- Isochronous (High-Speed) Transfer Descriptor (iTD)

5.4.3. EHCI Driver
ehci driver 负责把 echi 功能封装成标准的 hcd 驱动。它主要完成两项工作:
- 注册标准的 hcd 驱动。把
Client Software传送下来的urb映射到 EHCI 的链表中进行传输。 - 创建一个虚拟的根 hub 设备,即 roothub。
5.4.3.1. URB Transfer
ehci 注册 hcd 驱动:
static int ehci_platform_probe(struct platform_device *dev)
{

    /* (1) 分配 hcd,并且把 hcd->driver 初始化成 ehci_hc_driver */
    ehci_init_driver(&ehci_platform_hc_driver, &platform_overrides);
    hcd = usb_create_hcd(&ehci_platform_hc_driver, &dev->dev,
                dev_name(&dev->dev));

    /* (2) 注册标准的 hcd 驱动 */
    err = usb_add_hcd(hcd, irq, IRQF_SHARED);
}
hcd 驱动向上提供了标准接口,最终的实现会调用到 ehci_hc_driver 当中。
static const struct hc_driver ehci_hc_driver = {
    .description =          hcd_name,
    .product_desc =         "EHCI Host Controller",
    .hcd_priv_size =        sizeof(struct ehci_hcd),

    /*
    * generic hardware linkage
    */
    .irq =                  ehci_irq,
    .flags =                HCD_MEMORY | HCD_DMA | HCD_USB2 | HCD_BH,

    /*
    * basic lifecycle operations
    */
    .reset =                ehci_setup,
    .start =                ehci_run,
    .stop =                 ehci_stop,
    .shutdown =             ehci_shutdown,

    /*
    * managing i/o requests and associated device resources
    */
    .urb_enqueue =          ehci_urb_enqueue,
    .urb_dequeue =          ehci_urb_dequeue,
    .endpoint_disable =     ehci_endpoint_disable,
    .endpoint_reset =       ehci_endpoint_reset,
    .clear_tt_buffer_complete =     ehci_clear_tt_buffer_complete,

    /*
    * scheduling support
    */
    .get_frame_number =     ehci_get_frame,

    /*
    * root hub support
    */
    .hub_status_data =      ehci_hub_status_data,
    .hub_control =          ehci_hub_control,
    .bus_suspend =          ehci_bus_suspend,
    .bus_resume =           ehci_bus_resume,
    .relinquish_port =      ehci_relinquish_port,
    .port_handed_over =     ehci_port_handed_over,
    .get_resuming_ports =   ehci_get_resuming_ports,

    /*
    * device support
    */
    .free_dev =             ehci_remove_device,
};
在 urb transfer 过程中,最核心的是调用上述的 ehci_urb_enqueue() 和 ehci_urb_dequeue() 函数。
5.4.3.2. Roothub
首先创建虚拟的 roothub:
/* (1) 首先创建和初始化 `usb_device` 结构: */
ehci_platform_probe() → usb_add_hcd() → usb_alloc_dev():
struct usb_device *usb_alloc_dev(struct usb_device *parent,
                struct usb_bus *bus, unsigned port1)
{

    /* (1.1) dev 总线初始化为 usb_bus_type */
    dev->dev.bus = &usb_bus_type;
    /* (1.2) dev 类型初始化为 usb_device_type,标明自己是一个 usb device */
    dev->dev.type = &usb_device_type;
    dev->dev.groups = usb_device_groups;

}

/* (2) 然后注册  `usb_device` 结构: */
usb_add_hcd() → register_root_hub() → usb_new_device() → device_add()
然后因为 roothub 并不是在 Usb 物理总线上,所以对它的查询和配置需要特殊处理。详见 Usb Hub Driver 这一节。
6. USB Device 子系统代码架构
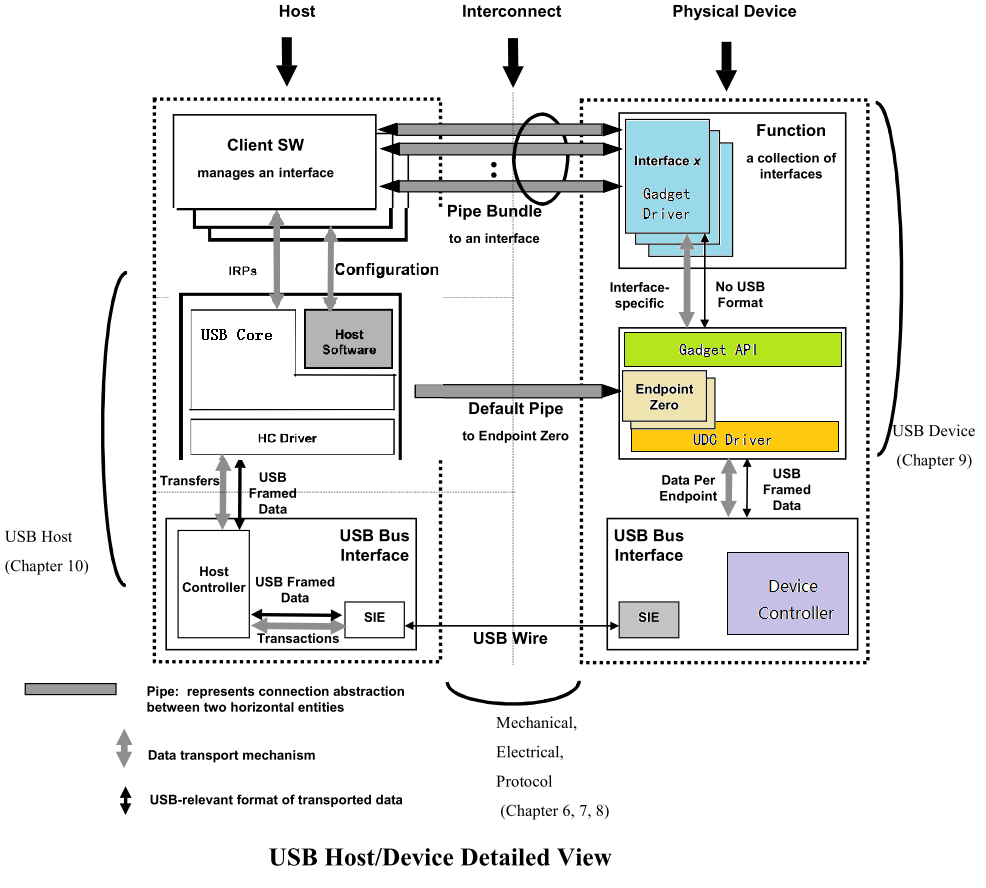
整个 USB 系统的通讯模型如上图所示,Device 框架见右侧彩图部分。
6.1. USB Device Controller Layer
上述软件栈的最底层是 UDC (USB Device Controller),UDC 层最主要的作用是提供一个 endpoint 资源池,负责处理 endpoint 层级的数据收发。
6.1.1. AIC USB Device Controller
ArtinChip UDC 在硬件层面实现了以下功能:
6.1.1.1. Data Mode
UDC 实现的一项主要工作是数据搬移:
- UDC 发送时,数据先从内存 Memory 搬移到 UDC 的内部 FIFO 当中,然后由 UDC 发送到 USB 物理线路上。
- UDC 接收时,数据先从 USB 物理线路接收到 UDC 的内部 FIFO 当中,然后再从 FIFO 拷贝到 内存 Memory 当中。
对于 FIFO 和 Memory 之间的数据搬移工作,当前 UDC 支持两种方式:
- DMA Mode。
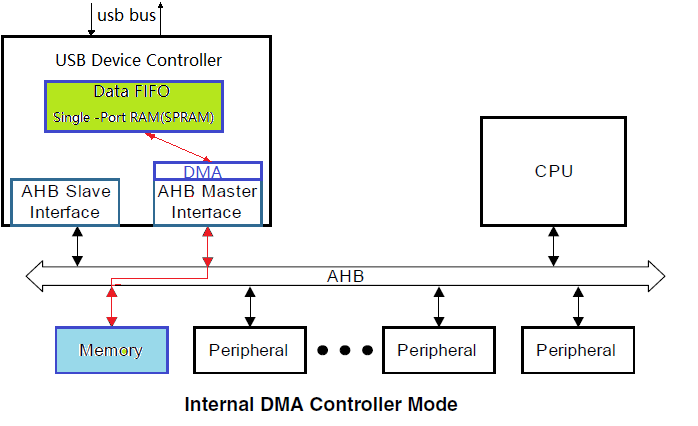
由 UDC 内部的 DMA 模块来承担数据搬移工作,只要使用寄存器配置好 FIFO 的分配,以及在寄存器中配置好 DMA 的其实地址,DMA 会完成数据的搬移。
- Slave Mode。
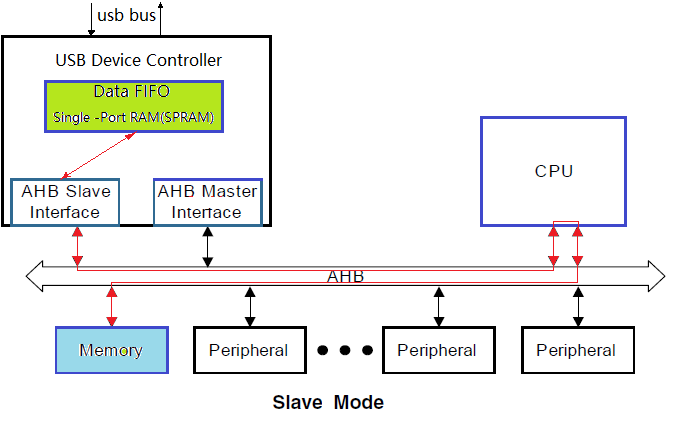
也可以不使用 DMA 而直接使用 CPU 来搬移,这种方式非常消耗 CPU 的带宽,CPU 被简单重复的数据拷贝拖住不能做其他的事情。这种方式一般用于 Debug 模式。
6.1.1.2. Endpoint FIFO Mode
不同的 UDC 中 Endpoint 对 FIFO 的使用有多种模式,当前 UDC 选用的是 Shared Transmit FIFO 模式。在 Shared Transmit FIFO 模式中, Endpoint 对 FIFO 使用模式如下:
- 所有的
non-periodic IN endpoints共享一个transmit FIFO。non-periodic endpoints包括isochronous transfers和interrupt transfers。 - 每一个
periodic IN endpoint独立拥有一个transmit FIFO。periodic endpoints包括bulk transfers和control transfers。 - 所有的
OUT endpoints共享一个receive FIFO。
6.1.1.3. Endpoint Resource
USB 协议定义一个 Device 最多可以实现 16 个 IN endpoint + 16 个 OUT endpoint。当前 UDC 实现了 5 个 IN endpoint + 5 个 OUT endpoint,除了 endpoint 0 IN/OUT 被系统默认使用,剩下的可以被驱动动态分配使用。
如上一节所描述,UDC 是 Shared Transmit FIFO 模式, periodic IN endpoint 需要拥有一个独立的 transmit FIFO。当前 UDC 拥有两个这样的 transmit FIFO 资源,供驱动动态分配。
如果驱动创建一个 periodic IN endpoint 它分配到了第一个 endpoint 资源,但是没有分配到 transmit FIFO 资源,也会创建失败。
6.1.1.4. Calculating FIFO Size
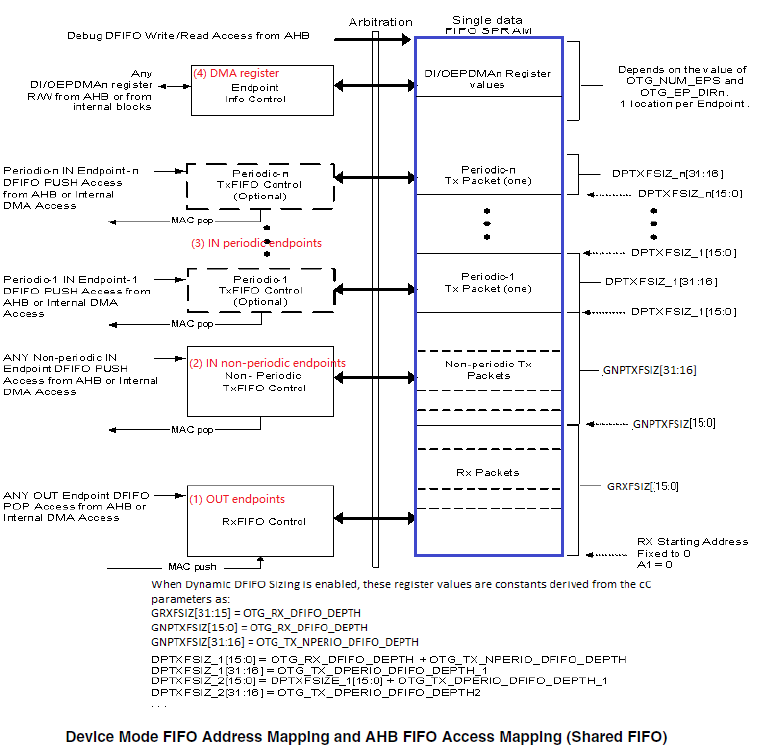
由上几节的描述可以看到,UDC 有多个模块需要使用内部 FIFO。包括:
- OUT endpoints RxFIFO
- IN non-periodic endpoints TxFIFO
- IN periodic endpoints TxFIFO
- DMA
UDC 内部 FIFO 总大小是固定的,那么怎么样来分配 FIFO 空间给这些模块呢? UDC 提供了以下计算公式:
- Receive FIFO RAM allocation
RAM for SETUP Packets: 4 * n + 6 locations in Scatter/Gather DMA mode and 5 * n+6 locations in Slave and Buffer DMA mode must be reserved in the RxFIFO to receive up to n SETUP packets on control endpoints, where n is the number of control endpoints the device core supports. The core does not use these locations, which are Reserved for SETUP packets, to write any other data.
// Setup 包的保留 RAM 空间(DMA 模式): 5*n + 6 locations,n 为 control endpoints 的个数。该部分只为 SETUP 包保留,不会写入其他数据。
One location for Global OUT NAK
// Global OUT NAK: 1 location
Status information is written to the FIFO along with each received packet. Therefore, a minimum space of (Largest Packet Size / 4) + 1 must be allotted to receive packets. If a high-bandwidth endpoint is enabled, or multiple isochronous endpoints are enabled, then at least two (Largest Packet Size / 4) + 1 spaces must be allotted to receive back-to-back packets. Typically, two (Largest Packet Size / 4) + 1 spaces are recommended so that when the previous packet is being transferred to AHB, the USB can receive the subsequent packet. If AHB latency is high, you must allocate enough space to receive multiple packets. This is critical to prevent dropping of any isochronous packets.
// 包接收空间: 最少 (Largest Packet Size / 4) + 1 spaces,如果空间充裕使用 two (Largest Packet Size / 4) + 1 spaces
Along with each endpoint’s last packet, transfer complete status information is also pushed to the FIFO. Typically, one location for each OUT endpoint is recommended.
// 对于每个 OUT endpoint ,最后一个包需要一个位置存放 transfer complete status information
An additional endpoint for each EPDisable is also required.
// 对于每个 OUT endpoint ,还需要一个位置存放 EPDisable
计算公式:
Device RxFIFO = (5 * number of control endpoints + 8) + ((largest USB packet used / 4) + 1 for status information) + (2 * number of OUT endpoints) + 1 for Global NAK
- Transmit FIFO RAM allocation
The RAM size for the Periodic Transmit FIFO must equal the maximum amount of data that can be transmitted in a single microframe. The core does not use any data RAM allocated over this requirement, and when data RAM allocated is less than this requirement, the core can malfunction.
// Periodic Transmit FIFO RAM大小必须等于在单个微帧中可以传输的最大数据量。核心不使用任何分配给这个需求的数据RAM,当分配的数据RAM小于这个需求时,核心可能会发生故障。
The minimum amount of RAM required for the Non-periodic Transmit FIFO is the largest maximum packet size among all supported non-periodic IN endpoints.
// Non-periodic Transmit FIFO 最小RAM数量是所有支持的非周期IN端点中最大的包大小。
More space allocated in the Transmit Non-periodic FIFO results in better performance on the USB and can hide AHB latencies. Typically, two Largest Packet Sizes’ worth of space is recommended, so that when the current packet is under transfer to the USB, the AHB can get the next packet. If the AHB latency is large, then you must allocate enough space to buffer multiple packets.
// Transmit Non-periodic FIFO 中分配更多的空间,可以在USB上获得更好的性能,并可以隐藏AHB延迟。通常,建议使用两个最大包大小的空间,以便当当前包正在传输到USB时,AHB可以获得下一个包。如果AHB延迟较大,则必须分配足够的空间来缓冲多个包。
It is assumed that i number of periodic FIFOs is implemented in Device mode.
// i 是 periodic FIFOs 的个数。
计算公式:
Non-Periodic TxFIFO = largest non-periodic USB packet used / 4
Periodic Endpoint-Specific TxFIFOs= largest periodic USB packet used for an endpoint / 4
- Internal Register Storage Space Allocation
When operating in Internal DMA mode, the core stores the Endpoint DMA address register (DI/OEPDMA) in the SPRAM. One location must be allocated for each endpoint.
// 当在内部DMA模式下运行时,核心将端点DMA地址寄存器(DI/OEPDMA)存储在SPRAM中。必须为每个端点分配一个位置。
For example, if an endpoint is bidirectional, then two locations must be allocated. If an endpoint is IN or OUT, then only one location must be allocated.
// 例如,如果一个端点是双向的,那么必须分配两个位置。如果端点是IN或OUT,则必须只分配一个位置。
Example
The MPS is 1,024 bytes for a periodic USB packet and 512 bytes for a non-periodic USB packet. There are three OUT endpoints, three IN endpoints, one control endpoint.
Device RxFIFO = (5 * 1 + 8) + ((1,024 / 4) +1) + (2 * 4) + 1 = 279
Non-Periodic TxFIFO = (512 / 4) = 128
Device Periodic TxFIFO:
 EP 1 = (1,024 / 4) = 256
 EP 2 = (1,024 / 4) = 256
 EP 3 = (1,024 / 4) = 256
当前 UDC
The MPS is 1,024 bytes for a periodic USB packet and 1024 bytes for a non-periodic USB packet. There are 4 OUT endpoints, 4 IN endpoints, 1 control endpoint.
Device RxFIFO = (5 * 1 + 8) + ((1,024 / 4) +1) + (2 * 5) + 1 = 281 = 0x119
Non-Periodic TxFIFO = (1024 / 4) = 256 = 0x100
Device Periodic TxFIFO:
 EP 1 = (1,024 / 4) = 256 = 0x100
 EP 2 = remain space = 0x3F6 - 0x119 - 0x100 - 0x100 = 0xDD
Internal Register Storage Space = 5 * 2 = 10 = 0xA
或者:
Device RxFIFO = (5 * 1 + 8) + ((1,024 / 4) +1) + (2 * 5) + 1 = 281 = 0x119
Non-Periodic TxFIFO = (1024 / 4) = 256 = 0x200
Device Periodic TxFIFO:
 EP 1 = (0x3F6 - 0x119 - 0x200) / 2 = 0x6E
 EP 2 = (0x3F6 - 0x119 - 0x200) / 2 = 0x6E
Internal Register Storage Space = 5 * 2 = 10 = 0xA
6.1.1.5. FIFO Mapping
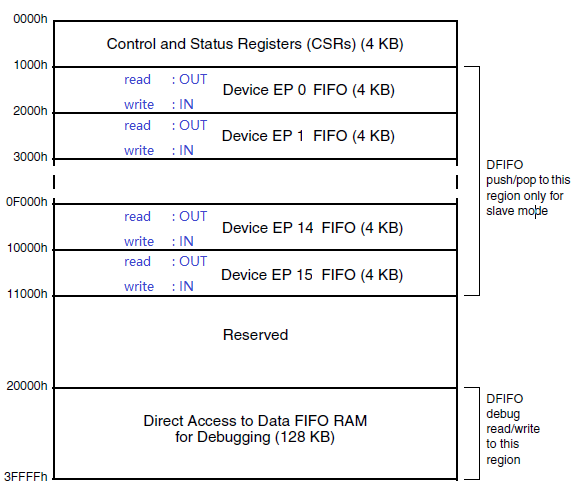
由上几节可知对一个端点 Endpoint 来说,它对应的 FIFO 是动态分配的。在 DMA 模式下,一旦初始化时配置完成就不用再去管 Endpoint FIFO 的地址。但是对 Slave 模式来说,在数据收发过程中需要 CPU 访问对应 FIFO 空间。
为了方便 CPU 对 Endpoint FIFO 的访问,UDC 把 Endpoint FIFO 映射到了固定地址。其中读操作会映射到 OUT Endpoint FIFO,写操作会映射到 IN Endpoint FIFO。
6.1.1.6. Interrupt Cascade
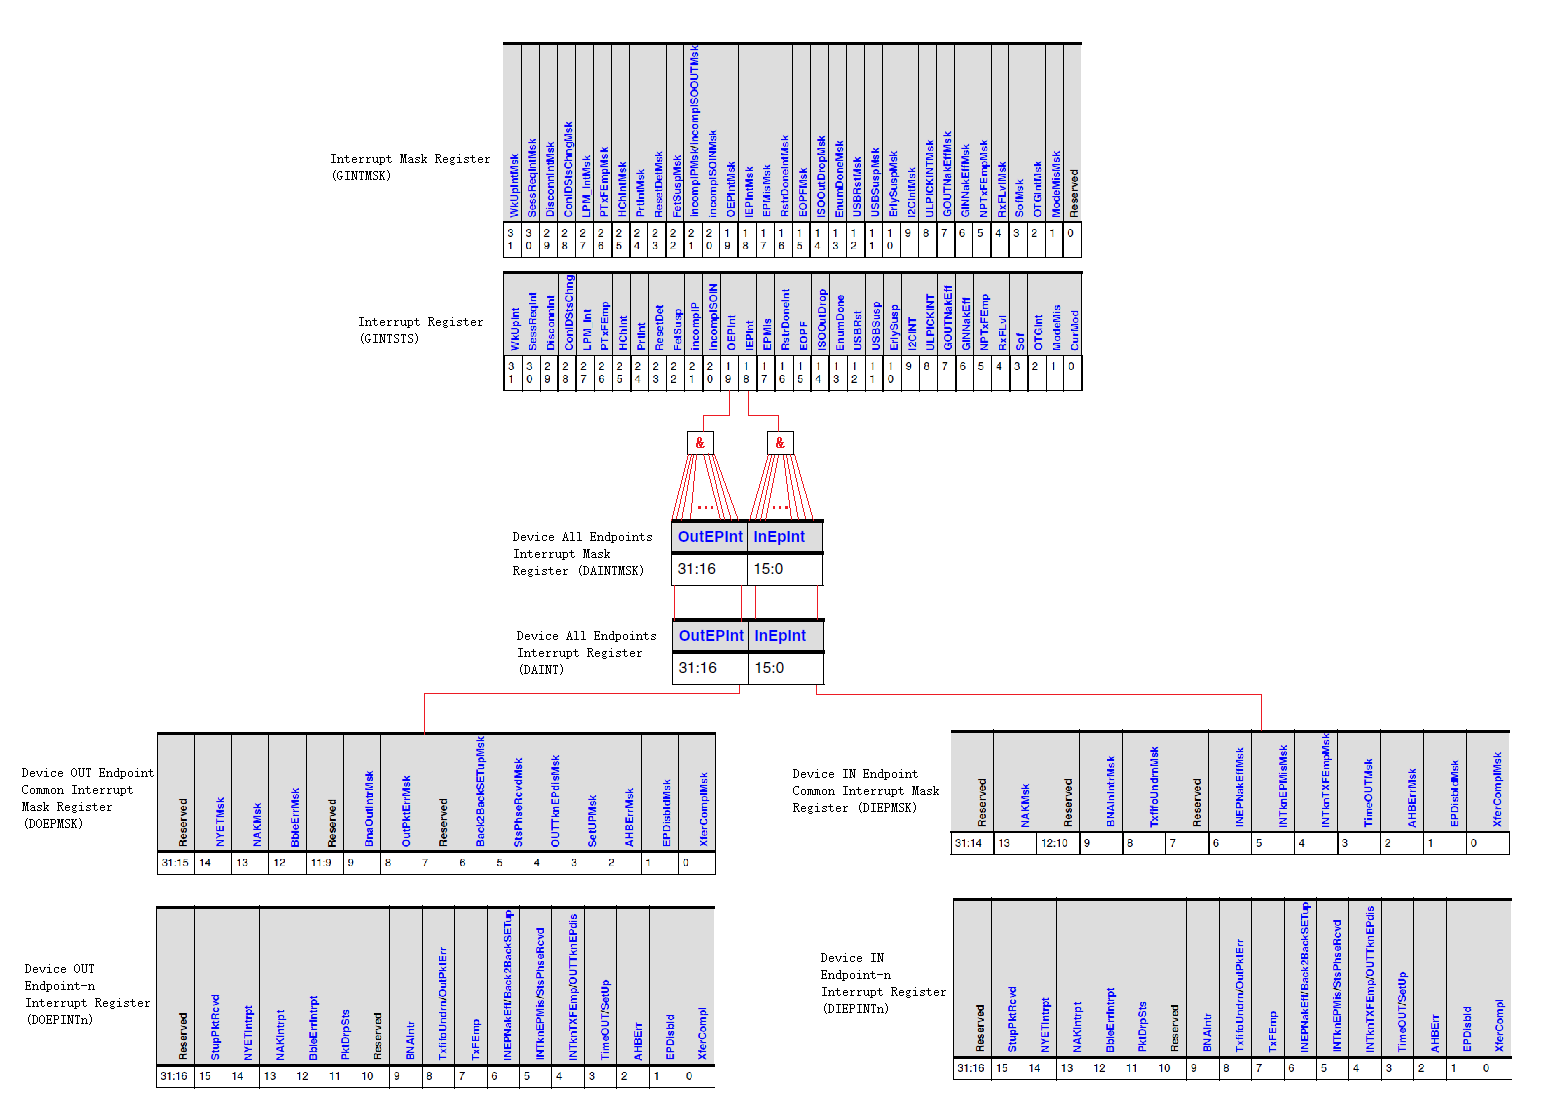
由于 UDC 的中断状态较多,所以分成 3 级级联:
- layer1:
GINTSTS&GINTMSK。全局中断,每一 bit 表示一个全局中断状态。其中:OEPInt表示有Out Endpoint中断发生 ,IEPInt表示有In Endpoint中断发生。 - layer2:
DAINT&DAINTMSK。Endpoint 中断,每一 bit 表示一个 Endpoint 发生了中断。 - layer3:
DOEPINTn&DOEPMSK,DIEPINTn&DIEPMSK。Endpoint 中断细节,每一个 Endpoint 拥有一组这样的寄存器。 寄存器中的每一 bit 代表某个 Endpoint 的某种中断状态。
6.1.1.7. Data Transfer
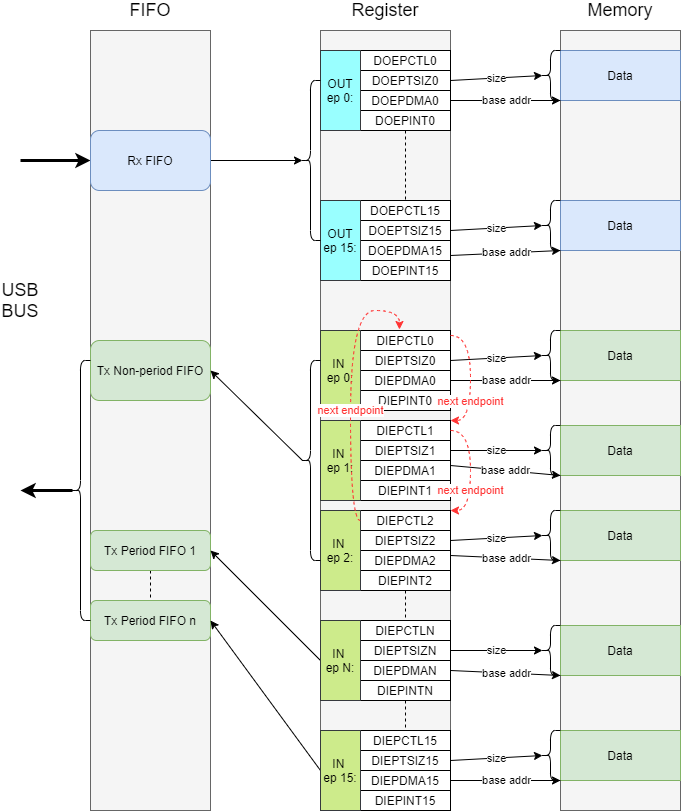
UDC 内部的数据收发流程如上图所示。主要的工作就是根据 USB 接收到的读写指令,把数据在 FIFO 和 Memory 之间进行搬移。具体分为几种情况:
- OUT Endpoint。所有 OUT Endpoint 的线路数据会接收到一个统一的
Rx FIFO当中,然后根据接收数据的具体 Endpoint配置的 Memory 地址和长度,DMA 把数据从 FIFO 搬移到对应 Memory 当中,最后产生中断。 - IN Non-period Endpoint。所有 IN Non-period Endpoint 共享一个统一的
Tx Non-period FIFO,根据Endpoint配置的 Memory 地址和长度,DMA 把数据从 Memory 搬移到统一的 FIFO 当中,发送到线路上后产生中断。IN Non-period Endpoint 需要配置Next Endpoint指针,这样 DMA处理完一个 Endpoint 的数据后才知道下一个需要处理的 Endpoint。 - IN Period Endpoint。每一个 IN Period Endpoint 拥有自己独立的 FIFO,根据Endpoint配置的 Memory 地址和长度,DMA 把数据从 Memory 搬移到对应的 FIFO 当中,发送到线路上后产生中断。
6.1.2. AIC UDC Driver
UDC Driver 在需要完成的工作有两点:
- 把 UDC 硬件注册成标准的 Gadget Device,以便提供标准的 Gadget API 给 Gadget Function 驱动来使用。
- 提供 endpoint 资源池,处理 endpoint 层级的数据收发。
- 需要处理部分 Endpoint0 Setup 逻辑。
6.1.2.1. Init
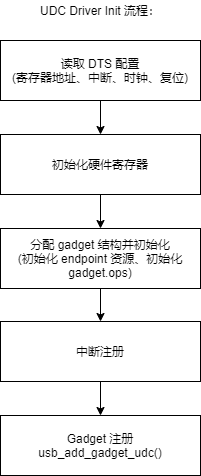
UDC 驱动把资源初始化好以后,注册成一个标准的 gadget 设备。
6.1.2.2. gadget.ops
UDC 驱动需要提供 gadget 设备的操作函数集 gadget.ops。简单定义如下:
static const struct usb_gadget_ops aic_usb_gadget_ops = {
    .get_frame              = aic_gg_getframe,
    .udc_start              = aic_gg_udc_start,
    .udc_stop               = aic_gg_udc_stop,
    .pullup                 = aic_gg_pullup,
    .vbus_session           = aic_gg_vbus_session,
    .vbus_draw              = aic_gg_vbus_draw,
};
其中的核心函数为 .udc_start() ,在调用该函数以后 UDC 才真正进入工作状态。其主要流程如下:
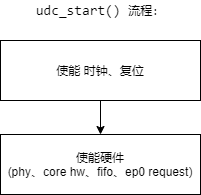
6.1.2.3. ep.ops
UDC 驱动需要提供 endpoint 的操作函数集 ep.ops。简单定义如下:
static const struct usb_ep_ops aic_usb_ep_ops = {
    .enable                 = aic_ep_enable,
    .disable                = aic_ep_disable,
    .alloc_request          = aic_ep_alloc_request,
    .free_request           = aic_ep_free_request,
    .queue                  = aic_ep_queue_request,
    .dequeue                = aic_ep_dequeue_request,
    .set_halt               = aic_ep_sethalt,
};
其中 .queue() 函数负责接收 Gadget Function 驱动发送下来的 usb_request。其主要流程如下:
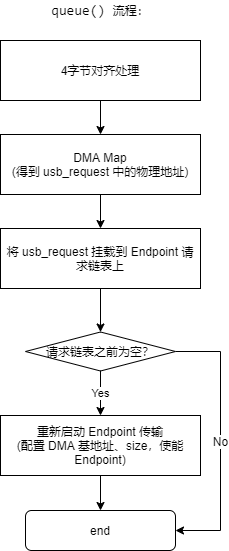
6.1.2.4. Interrupt
UDC 驱动主要承担的是数据收发,在上一节收到 usb_request 请求以后,接下来就是等待硬件处理完成产生中断了。中断处理的主要流程如下:

6.1.2.5. EP0 Setup
UDC 驱动还有一项重要工作就是负责 EP0 Control 状态机的处理。USB ep0 上的 Control Transfer 处理分为3个阶段: Setup Stage 、 Data In/Out Stage 、 Status In/Out Stage 。具体对应以下 5 种状态:
/* Gadget ep0 states */
enum ep0_state {
    EP0_SETUP,
    EP0_DATA_IN,
    EP0_DATA_OUT,
    EP0_STATUS_IN,
    EP0_STATUS_OUT,
};
这几种状态之间的转换流程如下所示:
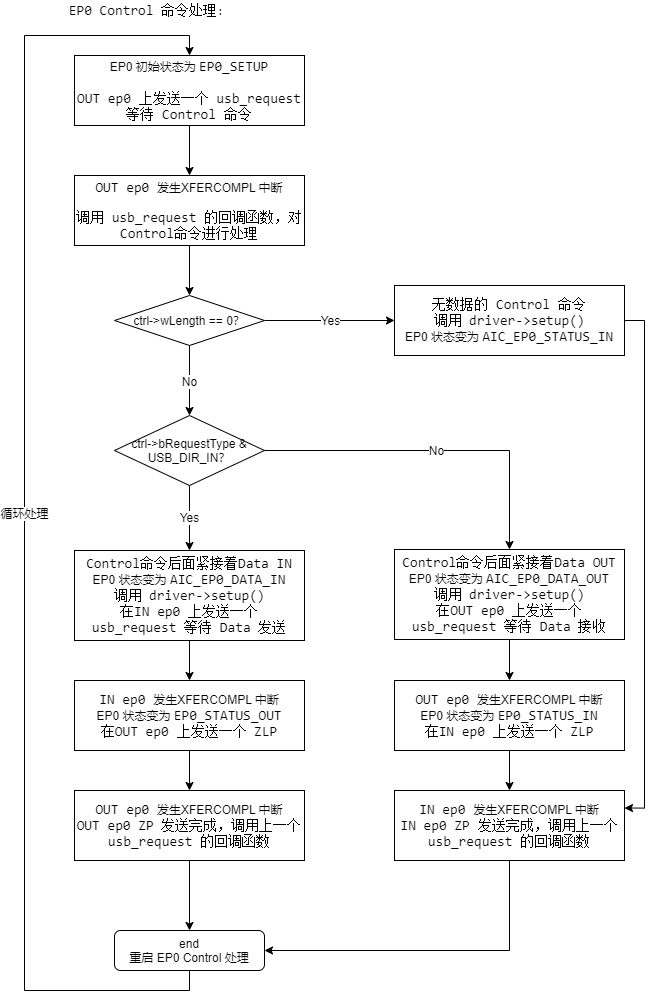
6.2. USB Device Layer
Linux 使用了一个 Gadget 的概念来组织 USB Device。
Gadget Layer 层把 UDC 提供的 endpoint 封装成标准的 Gadget Device,提供统一的向上接口。
Gadget Driver 又把各式各样的 Function 和 Gadget Device 链接起来。
6.2.1. Gadget Bus
Gadget Layer 层没有定义一个标准的 Bus 总线,而是自定义了两条链表来分别存储 Device 和 Driver:
| type | list | escript |
|---|---|---|
| Device | udc_list | 所有Device全集 |
| Driver | gadget_driver_pending_list | 只包含没有适配Device的Driver |
它们的使用场景如下:
- 在 Gadget Device 创建时,首先把 Device 加入到
udc_list链表,然后尝试和gadget_driver_pending_list链表中的 Driver 进行 match():
usb_add_gadget_udc() → usb_add_gadget_udc_release() → usb_add_gadget():

int usb_add_gadget(struct usb_gadget *gadget)
{

    /* (1) 将 device 加入全局链表 */
    list_add_tail(&udc->list, &udc_list);

    /* pick up one of pending gadget drivers */
    /* (2) 尝试 match gadget 的 device 和 driver */
    ret = check_pending_gadget_drivers(udc);
    if (ret)
        goto err_del_udc;

    mutex_unlock(&udc_lock);
}

↓

static int check_pending_gadget_drivers(struct usb_udc *udc)
{
    struct usb_gadget_driver *driver;
    int ret = 0;

    /* (2.1) 遍历 `gadget_driver_pending_list` 链表中的 Driver,和 Device 进行 match()
            且一个 Driver 只能 match 一个 Device,Driver match 成功后会从链表删除
    */
    list_for_each_entry(driver, &gadget_driver_pending_list, pending)
        if (!driver->udc_name || strcmp(driver->udc_name,
                        dev_name(&udc->dev)) == 0) {
            /* (2.2) Match 成功,对 Device 和 Driver 进行 bind() */
            ret = udc_bind_to_driver(udc, driver);
            if (ret != -EPROBE_DEFER)
                /* (2.3) Driver Match 成功后,从pending链表删除 */
                list_del_init(&driver->pending);
            break;
        }

    return ret;
}
- 在 Gadget Driver 创建时,首先尝试和
udc_list链表中的 Device 进行 match(),match() 不成功则把 Driver 加入到gadget_driver_pending_list链表中:
gadget_dev_desc_UDC_store() → usb_gadget_probe_driver():

int usb_gadget_probe_driver(struct usb_gadget_driver *driver)
{
    struct usb_udc          *udc = NULL;
    int                     ret = -ENODEV;

    if (!driver || !driver->bind || !driver->setup)
        return -EINVAL;

    mutex_lock(&udc_lock);
    /* (1.1) 如果 Driver 有 udc_name,尝试和 udc_list 链表中 Device 的 Name 进行 match()  */
    if (driver->udc_name) {
        list_for_each_entry(udc, &udc_list, list) {
            ret = strcmp(driver->udc_name, dev_name(&udc->dev));
            if (!ret)
                break;
        }
        if (ret)
            ret = -ENODEV;
        else if (udc->driver)
            ret = -EBUSY;
        else
            goto found;
    /* (1.2) 如果 Driver 没有 udc_name,尝试适配 udc_list 链表中第一个没有适配的 Device */
    } else {
        list_for_each_entry(udc, &udc_list, list) {
            /* For now we take the first one */
            if (!udc->driver)
                goto found;
        }
    }

    if (!driver->match_existing_only) {
        /* (2) 如果没有 match() 成功,则把 Driver 加入到 pending 链表 */
        list_add_tail(&driver->pending, &gadget_driver_pending_list);
        pr_info("udc-core: couldn't find an available UDC - added [%s] to list of pending drivers\n",
            driver->function);
        ret = 0;
    }

    mutex_unlock(&udc_lock);
    if (ret)
        pr_warn("udc-core: couldn't find an available UDC or it's busy\n");
    return ret;
found:
    /* (3) 如果 Match 成功,对 Device 和 Driver 进行 bind() */
    ret = udc_bind_to_driver(udc, driver);
    mutex_unlock(&udc_lock);
    return ret;
}
- 在 Device 和 Driver Match 成功时的 bind() 动作:
static int udc_bind_to_driver(struct usb_udc *udc, struct usb_gadget_driver *driver)
{
int ret;
dev_dbg(&udc->dev, "registering UDC driver [%s]\n",
driver->function);
/* (1) 数据��成员的赋值 */
udc->driver = driver;
udc->dev.driver = &driver->driver;
udc->gadget->dev.driver = &driver->driver;
usb_gadget_udc_set_speed(udc, driver->max_speed);
/* (2) 调用 Gadget Driver 的 bind() 函数 */
ret = driver->bind(udc->gadget, driver);
if (ret)
goto err1;
/* (3) 调用 Gadget Device 的 start() 函数
udc->gadget->ops->udc_start(udc->gadget, udc->driver);
*/
ret = usb_gadget_udc_start(udc);
if (ret) {
driver->unbind(udc->gadget);
goto err1;
}
/* (4) 调用 Gadget Device 的 pullup() 函数
gadget->ops->pullup(gadget, 1/0);
*/
usb_udc_connect_control(udc);
kobject_uevent(&udc->dev.kobj, KOBJ_CHANGE);
return 0;
}
注意:这里和一般的 Device 和 Driver 的适配规则有些不一样。一般的规则是一个 Dirver 可以适配多个 Device,而一个 Device 只能适配一个 Driver。而这里的规则是一个 Gadget Device 只能适配一个 Gadget Driver,而一个 Gadget Driver 只能适配一个 Gadget Device。 Gadget Driver 代表的是一个 Composite Device。
6.2.2. Gadget Device
上一节说过 Gadget Device 由 UDC Driver 创建。
dwc2_driver_probe() → usb_add_gadget_udc() → usb_add_gadget_udc_release() → usb_add_gadget()
Gadget Device 的主要作用是提供了 Endpoint 资源,供 Function Layer 使用标准的 Gadget API 来进行访问。
6.2.2.1. Endpoint Alloc
UDC Driver 在调用 usb_add_gadget_udc() 注册 Gadget Device 之前,初始化了 Gadget 的 Endpoint 资源链表:
dwc2_driver_probe() → dwc2_gadget_init():

int dwc2_gadget_init(struct dwc2_hsotg *hsotg)
{

    /* (1) 初始化 Gadget Device 的 Endpoint 资源链表为空  */
    INIT_LIST_HEAD(&hsotg->gadget.ep_list);
    hsotg->gadget.ep0 = &hsotg->eps_out[0]->ep;


    /* initialise the endpoints now the core has been initialised */
    /* (2) 初始化 UDC 拥有的 Endpoint,加入到 Gadget Device 的 Endpoint 资源链表中 */
    for (epnum = 0; epnum < hsotg->num_of_eps; epnum++) {
        if (hsotg->eps_in[epnum])
            dwc2_hsotg_initep(hsotg, hsotg->eps_in[epnum],
                    epnum, 1);
        if (hsotg->eps_out[epnum])
            dwc2_hsotg_initep(hsotg, hsotg->eps_out[epnum],
                    epnum, 0);
    }

}

↓

static void dwc2_hsotg_initep(struct dwc2_hsotg *hsotg,
                struct dwc2_hsotg_ep *hs_ep,
                    int epnum,
                    bool dir_in)
{


    INIT_LIST_HEAD(&hs_ep->queue);
    INIT_LIST_HEAD(&hs_ep->ep.ep_list);

    /* add to the list of endpoints known by the gadget driver */
    /* (2.1) UDC 中除了 endpoint0 以外,其他的 endpoint 都加入到Gadget Device 的 Endpoint 资源链表 `gadget.ep_list` 中
            endpoint0 的操作由 UDC 驱动自己来处理
    */
    if (epnum)
        list_add_tail(&hs_ep->ep.ep_list, &hsotg->gadget.ep_list);

    /* (2.2) 初始化 endpoint 的结构体成员 */
    hs_ep->parent = hsotg;
    hs_ep->ep.name = hs_ep->name;

    if (hsotg->params.speed == DWC2_SPEED_PARAM_LOW)
        usb_ep_set_maxpacket_limit(&hs_ep->ep, 8);
    else
        usb_ep_set_maxpacket_limit(&hs_ep->ep,
                    epnum ? 1024 : EP0_MPS_LIMIT);

    /* (2.3) endpoint 最重要的结构体成员,endpoint 操作函数集
        endpoint 的相关操作最后调用到这些函数上
    */
    hs_ep->ep.ops = &dwc2_hsotg_ep_ops;

    if (epnum == 0) {
        hs_ep->ep.caps.type_control = true;
    } else {
        if (hsotg->params.speed != DWC2_SPEED_PARAM_LOW) {
            hs_ep->ep.caps.type_iso = true;
            hs_ep->ep.caps.type_bulk = true;
        }
        hs_ep->ep.caps.type_int = true;
    }

    if (dir_in)
        hs_ep->ep.caps.dir_in = true;
    else
        hs_ep->ep.caps.dir_out = true;

}
Gadget Device 准备好了 Endpoint 资源链表以后,通过 usb_add_gadget_udc() 注册。这样就可以 Function Layer 就可以通过调用 Gadget Api 来动态分配 Endpoint 了。例如:
static int
acm_bind(struct usb_configuration *c, struct usb_function *f)
{

    /* allocate instance-specific endpoints */
    /* (1) 从 Gadget Device 中分配一个 in endpoint */
    ep = usb_ep_autoconfig(cdev->gadget, &acm_fs_in_desc);
    if (!ep)
        goto fail;
    acm->port.in = ep;

    /* (2) 从 Gadget Device 中分配一个 out endpoint */
    ep = usb_ep_autoconfig(cdev->gadget, &acm_fs_out_desc);
    if (!ep)
        goto fail;
    acm->port.out = ep;

    /* (3) 从 Gadget Device 中分配一个 notify endpoint */
    ep = usb_ep_autoconfig(cdev->gadget, &acm_fs_notify_desc);
    if (!ep)
        goto fail;
    acm->notify = ep;

}
其中通过 usb_ep_autoconfig() 函数从 Gadget Device 的 Endpoint 资源链表中分配空闲的 endpoint:
drivers\usb\gadget\function\f_acm.c:

usb_ep_autoconfig() → usb_ep_autoconfig_ss():

struct usb_ep *usb_ep_autoconfig_ss(
    struct usb_gadget               *gadget,
    struct usb_endpoint_descriptor  *desc,
    struct usb_ss_ep_comp_descriptor *ep_comp
)
{
    struct usb_ep   *ep;

    if (gadget->ops->match_ep) {
        ep = gadget->ops->match_ep(gadget, desc, ep_comp);
        if (ep)
            goto found_ep;
    }

    /* Second, look at endpoints until an unclaimed one looks usable */
    /* (1) 从 Gadget Device 的 Endpoint 资源链表中查找一个空闲的(ep->claimed为空) 且符合要求的 endpoint  */
    list_for_each_entry (ep, &gadget->ep_list, ep_list) {
        if (usb_gadget_ep_match_desc(gadget, ep, desc, ep_comp))
            goto found_ep;
    }

    /* Fail */
    return NULL;
found_ep:

    ...

    ep->address = desc->bEndpointAddress;
    ep->desc = NULL;
    ep->comp_desc = NULL;
    /* (2) 设置 endpoint 为已分配 */
    ep->claimed = true;
    return ep;
}
6.2.2.2. EndPoint Access
Gadget Device 不仅仅为 Gadget Api 提供了分配 endpoint 的支持,还支持对 endpoint 收发数据的底层支持。在上一节的 endpoint 初始化时,就已经设置 endpoint 的操作函数集 dwc2_hsotg_ep_ops :
dwc2_driver_probe() → dwc2_gadget_init() → dwc2_hsotg_initep():

static void dwc2_hsotg_initep(struct dwc2_hsotg *hsotg,
                struct dwc2_hsotg_ep *hs_ep,
                    int epnum,
                    bool dir_in)
{

    /* (2.3) endpoint 最重要的结构体成员,endpoint 操作函数集
        endpoint 的相关操作最后调用到这些函数上
    */
    hs_ep->ep.ops = &dwc2_hsotg_ep_ops;

}

↓

static const struct usb_ep_ops dwc2_hsotg_ep_ops = {
    .enable         = dwc2_hsotg_ep_enable,
    .disable        = dwc2_hsotg_ep_disable_lock,
    .alloc_request  = dwc2_hsotg_ep_alloc_request,
    .free_request   = dwc2_hsotg_ep_free_request,
    .queue          = dwc2_hsotg_ep_queue_lock,
    .dequeue        = dwc2_hsotg_ep_dequeue,
    .set_halt       = dwc2_hsotg_ep_sethalt_lock,
    /* note, don't believe we have any call for the fifo routines */
};
Gadget Api 提供了以下接口来操作 endpoint 读写数据。在 Host 侧对 endpoint 进行一次操作请求的数据结构是 struct urb ,而在 Device 侧也有类似的数据结构称为 struct usb_request ,对 endpoint 的数据读写就是围绕 struct usb_request 展开的:
drivers\usb\gadget\function\f_acm.c:

static int acm_cdc_notify(struct f_acm *acm, u8 type, u16 value,
        void *data, unsigned length)
{
    struct usb_ep                   *ep = acm->notify;
    struct usb_request              *req;
    struct usb_cdc_notification     *notify;
    const unsigned                  len = sizeof(*notify) + length;
    void                            *buf;
    int                             status;

    /* (1) 初始化 `struct usb_request` 数据结构 */
    req = acm->notify_req;
    acm->notify_req = NULL;
    acm->pending = false;

    req->length = len;
    notify = req->buf;
    buf = notify + 1;

    notify->bmRequestType = USB_DIR_IN | USB_TYPE_CLASS
            | USB_RECIP_INTERFACE;
    notify->bNotificationType = type;
    notify->wValue = cpu_to_le16(value);
    notify->wIndex = cpu_to_le16(acm->ctrl_id);
    notify->wLength = cpu_to_le16(length);
    memcpy(buf, data, length);

    /* ep_queue() can complete immediately if it fills the fifo... */
    spin_unlock(&acm->lock);
    /* (2) 提交 `usb_request` 请求到 endpoint 处理队列中 */
    status = usb_ep_queue(ep, req, GFP_ATOMIC);
    spin_lock(&acm->lock);

}
其中 usb_ep_queue() 函数就会调用 endpoint 的操作函数集 dwc2_hsotg_ep_ops 中的 .queue 函数:
int usb_ep_queue(struct usb_ep *ep,
                struct usb_request *req, gfp_t gfp_flags)
{
    int ret = 0;

    if (WARN_ON_ONCE(!ep->enabled && ep->address)) {
        ret = -ESHUTDOWN;
        goto out;
    }

    /* (1) 实际调用 dwc2_hsotg_ep_queue_lock() */
    ret = ep->ops->queue(ep, req, gfp_flags);

out:
    trace_usb_ep_queue(ep, req, ret);

    return ret;
}
6.2.2.3. UDC Control
Gadget Device 还提供了 UDC 层级的一些操作函数,UDC Driver 在调用 usb_add_gadget_udc() 注册 Gadget Device 之前,初始化了 Gadget 的 操作函数集:
dwc2_driver_probe() → dwc2_gadget_init():

int dwc2_gadget_init(struct dwc2_hsotg *hsotg)
{

    hsotg->gadget.max_speed = USB_SPEED_HIGH;
    /* (1) 初始化 Gadget Device 的操作函数集  */
    hsotg->gadget.ops = &dwc2_hsotg_gadget_ops;
    hsotg->gadget.name = dev_name(dev);
    hsotg->remote_wakeup_allowed = 0;

}

↓

static const struct usb_gadget_ops dwc2_hsotg_gadget_ops = {
    .get_frame      = dwc2_hsotg_gadget_getframe,
    .set_selfpowered        = dwc2_hsotg_set_selfpowered,
    .udc_start              = dwc2_hsotg_udc_start,
    .udc_stop               = dwc2_hsotg_udc_stop,
    .pullup                 = dwc2_hsotg_pullup,
    .vbus_session           = dwc2_hsotg_vbus_session,
    .vbus_draw              = dwc2_hsotg_vbus_draw,
};
Gadget Api 提供了一些内部函数来调用:
static inline int usb_gadget_udc_start(struct usb_udc *udc)
{
    return udc->gadget->ops->udc_start(udc->gadget, udc->driver);
}

static inline void usb_gadget_udc_stop(struct usb_udc *udc)
{
    udc->gadget->ops->udc_stop(udc->gadget);
}

static inline void usb_gadget_udc_set_speed(struct usb_udc *udc,
                        enum usb_device_speed speed)
{
    if (udc->gadget->ops->udc_set_speed) {
        enum usb_device_speed s;

        s = min(speed, udc->gadget->max_speed);
        udc->gadget->ops->udc_set_speed(udc->gadget, s);
    }
}

int usb_gadget_connect(struct usb_gadget *gadget)
{
    int ret = 0;

    if (!gadget->ops->pullup) {
        ret = -EOPNOTSUPP;
        goto out;
    }

    if (gadget->deactivated) {
        /*
        * If gadget is deactivated we only save new state.
        * Gadget will be connected automatically after activation.
        */
        gadget->connected = true;
        goto out;
    }

    ret = gadget->ops->pullup(gadget, 1);
    if (!ret)
        gadget->connected = 1;

out:
    trace_usb_gadget_connect(gadget, ret);

    return ret;
}

int usb_gadget_disconnect(struct usb_gadget *gadget)
{
    int ret = 0;

    if (!gadget->ops->pullup) {
        ret = -EOPNOTSUPP;
        goto out;
    }

    if (!gadget->connected)
        goto out;

    if (gadget->deactivated) {
        /*
        * If gadget is deactivated we only save new state.
        * Gadget will stay disconnected after activation.
        */
        gadget->connected = false;
        goto out;
    }

    ret = gadget->ops->pullup(gadget, 0);
    if (!ret) {
        gadget->connected = 0;
        gadget->udc->driver->disconnect(gadget);
    }

out:
    trace_usb_gadget_disconnect(gadget, ret);

    return ret;
}
6.2.3. Gadget Driver (Configfs)
Gadget Device 支撑了核心 Gadget Api 的实现,而 Function Layer 又需要使用这些 Api。怎么样将两者适配起来?Gadget Driver 就是用来完成这项工作的。
目前存在两种风格的 Gadget Driver,其中包括:
- Legacy。这是早期风格的 Gadget Driver,只能通过静态编译的方式指定使用哪些 Function。
- Configfs。这是目前流行的 Gadget Driver,可以通过 configfs 文件系统,不用重新编译内核,动态的配置需要使用的 Function。
我们首先介绍 configfs 风格的 Gadget Driver。
6.2.3.1. Configfs 使用
首先从使用上体验一下 configfs 的便捷。例如创建一个 ACM Function:
// 1、挂载configfs文件系统。
mount -t configfs none /sys/kernel/config
cd /sys/kernel/config/usb_gadget

// 2、创建g1目录,实例化一个新的gadget模板 (composite device)。
mkdir g1
cd g1

// 3.1、定义USB产品的VID和PID。
echo "0x1d6b" > idVendor
echo "0x0104" > idProduct

// 3.2、实例化英语语言ID。(0x409是USB language ID 美国英语,不是任意的,可以在USBIF网站上下载文档查询。)
mkdir strings/0x409
ls strings/0x409/
// 3.3、将开发商、产品和序列号字符串写入内核。
echo "0123456789" > strings/0x409/serialnumber
echo "AAAA Inc." > strings/0x409/manufacturer
echo "Bar Gadget" > strings/0x409/product

// 4、创建 `Function` 功能实例,需要注意的是,一个功能如果有多个实例的话,扩展名必须用数字编号。
mkdir functions/acm.GS0

// 5.1、创建一个USB `Configuration` 配置实例:
mkdir configs/c.1
ls configs/c.1
// 5.2、定义配置描述符使用的字符串
mkdir configs/c.1/strings/0x409
ls configs/c.1/strings/0x409/
echo "ACM" > configs/c.1/strings/0x409/configuration

// 6、捆绑功能 `Function` 实例到 `Configuration` 配置c.1
ln -s functions/acm.GS0 configs/c.1

// 7.1、查找本机可获得的UDC实例 (即 gadget device)
# ls /sys/class/udc/
10200000.usb
// 7.2、将gadget驱动注册到UDC上,插上USB线到电脑上,电脑就会枚举USB设备。
echo "10200000.usb" > UDC
6.2.3.2. Configfs 层次结构
configfs 并不是 gadget 专用的,它是一个通用文件系统,方便用户通过文件系统创建文件夹、文件的方式来创建内核对象。
configfs 是很好理解的, struct config_group 相当于一个文件夹, struct config_item_type 是这个文件夹的属性集。其中 config_item_type->ct_group_ops->make_group()/drop_item() 定义了创建/销毁下一层子文件夹的方法, config_item_type->ct_attrs 定义了子文件和相关操作函数。
我们通过解析 drivers\usb\gadget\configfs.c 文件来深入理解 configfs 的使用方法:
- 首先创建首层文件夹
/sys/kernel/config/usb_gadget:
static struct configfs_group_operations gadgets_ops = {
    .make_group     = &gadgets_make,
    .drop_item      = &gadgets_drop,
};

static const struct config_item_type gadgets_type = {
    .ct_group_ops   = &gadgets_ops,
    .ct_owner       = THIS_MODULE,
};

static struct configfs_subsystem gadget_subsys = {
    .su_group = {
        .cg_item = {
            .ci_namebuf = "usb_gadget",
            .ci_type = &gadgets_type,
        },
    },
    .su_mutex = __MUTEX_INITIALIZER(gadget_subsys.su_mutex),
};

static int __init gadget_cfs_init(void)
{
    int ret;

    config_group_init(&gadget_subsys.su_group);

    ret = configfs_register_subsystem(&gadget_subsys);
    return ret;
}
module_init(gadget_cfs_init);
- 创建
/sys/kernel/config/usb_gadget/g1,相当于创建一个全新的composite device。会调用顶层struct config_group的config_item_type->ct_group_ops->make_group()函数,即gadgets_make():
static struct config_group *gadgets_make(
struct config_group *group,
const char *name)
{
struct gadget_info *gi;
gi = kzalloc(sizeof(*gi), GFP_KERNEL);
if (!gi)
return ERR_PTR(-ENOMEM);
/* (1) 创建顶层文件夹 `/sys/kernel/config/usb_gadget/g1` 对应的 `struct config_group` 结构
`/sys/kernel/config/usb_gadget/g1` 下对应不少子文件,在 gadget_root_type.ct_attrs 中定义,即 `gadget_root_attrs`:
static struct configfs_attribute *gadget_root_attrs[] = {
&gadget_dev_desc_attr_bDeviceClass,
&gadget_dev_desc_attr_bDeviceSubClass,
&gadget_dev_desc_attr_bDeviceProtocol,
&gadget_dev_desc_attr_bMaxPacketSize0,
&gadget_dev_desc_attr_idVendor,
&gadget_dev_desc_attr_idProduct,
&gadget_dev_desc_attr_bcdDevice,
&gadget_dev_desc_attr_bcdUSB,
&gadget_dev_desc_attr_UDC,
&gadget_dev_desc_attr_max_speed,
NULL,
};
*/
config_group_init_type_name(&gi->group, name, &gadget_root_type);
/* (2) 创建子文件夹 `/sys/kernel/config/usb_gadget/g1/functions`
`functions_type` 中定义了进一步创建子文件夹的操作函数
*/
config_group_init_type_name(&gi->functions_group, "functions",
&functions_type);
configfs_add_default_group(&gi->functions_group, &gi->group);
/* (3) 创建子文件夹 `/sys/kernel/config/usb_gadget/g1/configs`
`config_desc_type` 中定义了进一步创建子文件夹的操作函数
*/
config_group_init_type_name(&gi->configs_group, "configs",
&config_desc_type);
configfs_add_default_group(&gi->configs_group, &gi->group);
/* (4) 创建子文件夹 `/sys/kernel/config/usb_gadget/g1/strings`
`gadget_strings_strings_type` 中定义了进一步创建子文件夹的操作函数
*/
config_group_init_type_name(&gi->strings_group, "strings",
&gadget_strings_strings_type);
configfs_add_default_group(&gi->strings_group, &gi->group);
/* (5) 创建子文件夹 `/sys/kernel/config/usb_gadget/g1/os_desc`
`os_desc_type` 中定义了进一步创建哪些子文件
*/
config_group_init_type_name(&gi->os_desc_group, "os_desc",
&os_desc_type);
configfs_add_default_group(&gi->os_desc_group, &gi->group);
/* (6) `configfs.c` 的目�的很明确就是创建一个 `composite device`
由用户添加和配置这个 `device` 当中的多个 `interface` 即 `function`
*/
gi->composite.bind = configfs_do_nothing;
gi->composite.unbind = configfs_do_nothing;
gi->composite.suspend = NULL;
gi->composite.resume = NULL;
gi->composite.max_speed = USB_SPEED_SUPER_PLUS;
spin_lock_init(&gi->spinlock);
mutex_init(&gi->lock);
INIT_LIST_HEAD(&gi->string_list);
INIT_LIST_HEAD(&gi->available_func);
composite_init_dev(&gi->cdev);
gi->cdev.desc.bLength = USB_DT_DEVICE_SIZE;
gi->cdev.desc.bDescriptorType = USB_DT_DEVICE;
gi->cdev.desc.bcdDevice = cpu_to_le16(get_default_bcdDevice());
gi->composite.gadget_driver = configfs_driver_template;
gi->composite.gadget_driver.function = kstrdup(name, GFP_KERNEL);
gi->composite.name = gi->composite.gadget_driver.function;
if (!gi->composite.gadget_driver.function)
goto err;
return &gi->group;
err:
kfree(gi);
return ERR_PTR(-ENOMEM);
}
- 创建
/sys/kernel/config/usb_gadget/g1/functions/acm.GS0。会调用functions_type中定义的 function_make() 函数:
static struct config_group *function_make(
        struct config_group *group,
        const char *name)
{
    struct gadget_info *gi;
    struct usb_function_instance *fi;
    char buf[MAX_NAME_LEN];
    char *func_name;
    char *instance_name;
    int ret;

    ret = snprintf(buf, MAX_NAME_LEN, "%s", name);
    if (ret >= MAX_NAME_LEN)
        return ERR_PTR(-ENAMETOOLONG);

    /* (1) 把 `acm.GS0` 分割成两部分:
            func_name = `acm`
            instance_name = `GS0`
    */
    func_name = buf;
    instance_name = strchr(func_name, '.');
    if (!instance_name) {
        pr_err("Unable to locate . in FUNC.INSTANCE\n");
        return ERR_PTR(-EINVAL);
    }
    *instance_name = '\0';
    instance_name++;

    /* (2) 根据 func_name 在全局链表中查找对应 function
            usb_get_function_instance() → try_get_usb_function_instance() → fd->alloc_inst() → acm_alloc_instance():
            并调用 usb_function_driver->alloc_inst() 分配一个 function 实例
    */
    fi = usb_get_function_instance(func_name);
    if (IS_ERR(fi))
        return ERR_CAST(fi);

    /* (3) 初始化 function 实例 */
    ret = config_item_set_name(&fi->group.cg_item, "%s", name);
    if (ret) {
        usb_put_function_instance(fi);
        return ERR_PTR(ret);
    }
    if (fi->set_inst_name) {
        ret = fi->set_inst_name(fi, instance_name);
        if (ret) {
            usb_put_function_instance(fi);
            return ERR_PTR(ret);
        }
    }

    gi = container_of(group, struct gadget_info, functions_group);

    mutex_lock(&gi->lock);
    /* (4) 将 function 实例挂载到 composite device 的 function 链表当中去 */
    list_add_tail(&fi->cfs_list, &gi->available_func);
    mutex_unlock(&gi->lock);
    return &fi->group;
}
在 ln -s functions/acm.GS0 configs/c.1 时给 function 实例安装实际的函数:
config_usb_cfg_link() → usb_get_function() → fi->fd->alloc_func() → acm_alloc_func():

static struct usb_function *acm_alloc_func(struct usb_function_instance *fi)
{
    struct f_serial_opts *opts;
    struct f_acm *acm;

    /* (2.1) 对应分配一个 func 实例 */
    acm = kzalloc(sizeof(*acm), GFP_KERNEL);
    if (!acm)
        return ERR_PTR(-ENOMEM);

    spin_lock_init(&acm->lock);

    /* (2.2) 初始化 func 实例的成员函数 */
    acm->port.connect = acm_connect;
    acm->port.disconnect = acm_disconnect;
    acm->port.send_break = acm_send_break;

    acm->port.func.name = "acm";
    acm->port.func.strings = acm_strings;
    /* descriptors are per-instance copies */
    acm->port.func.bind = acm_bind;
    acm->port.func.set_alt = acm_set_alt;
    acm->port.func.setup = acm_setup;
    acm->port.func.disable = acm_disable;

    opts = container_of(fi, struct f_serial_opts, func_inst);
    acm->port_num = opts->port_num;
    acm->port.func.unbind = acm_unbind;
    acm->port.func.free_func = acm_free_func;
    acm->port.func.resume = acm_resume;
    acm->port.func.suspend = acm_suspend;

    return &acm->port.func;
}
6.2.3.3. Gadget Driver
Configfs 风格的 gadget driver 的定义:
drivers\usb\gadget\configfs.c:

static const struct usb_gadget_driver configfs_driver_template = {
    .bind           = configfs_composite_bind,
    .unbind         = configfs_composite_unbind,

    .setup          = configfs_composite_setup,
    .reset          = configfs_composite_disconnect,
    .disconnect     = configfs_composite_disconnect,

    .suspend        = configfs_composite_suspend,
    .resume         = configfs_composite_resume,

    .max_speed      = USB_SPEED_SUPER_PLUS,
    .driver = {
        .owner          = THIS_MODULE,
        .name               = "configfs-gadget",
    },
    .match_existing_only = 1,
};
在调用 echo "/sys/class/udc/10200000.usb" > /sys/kernel/config/usb_gadget/g1/UDC 时,将上述 gadget driver 进行注册,和 UDC 已经注册好的 gadget device 进行动态适配。
gadget_dev_desc_UDC_store() → usb_gadget_probe_driver(&gi->composite.gadget_driver) → udc_bind_to_driver()
本质上是 使用 configfs 创建好的 composite device 和 gadget device 进行绑定:
gadget_dev_desc_UDC_store() → usb_gadget_probe_driver() → udc_bind_to_driver() → configfs_composite_bind() → usb_add_function() → function->bind() → acm_bind():

static int
acm_bind(struct usb_configuration *c, struct usb_function *f)
{
    /* (1) 这样 function 实例和 gadget device 进行了绑定 */
    struct usb_composite_dev *cdev = c->cdev;
    struct f_acm            *acm = func_to_acm(f);

    /* allocate instance-specific endpoints */
    /* (2) function 实例可以从 gadget device 中分配得到 endpoint */
    ep = usb_ep_autoconfig(cdev->gadget, &acm_fs_in_desc);
    if (!ep)
        goto fail;
    acm->port.in = ep;

    ep = usb_ep_autoconfig(cdev->gadget, &acm_fs_out_desc);
    if (!ep)
        goto fail;
    acm->port.out = ep;

    ep = usb_ep_autoconfig(cdev->gadget, &acm_fs_notify_desc);
    if (!ep)
        goto fail;
    acm->notify = ep;

}
但是 bind() 以后 function 实例只是分配了 endpoint 资源还没有被启动,因为 Device 是被动状态,只有连上 Host,被 Host Set Configuration 操作以后。某一组 Configuration 被配置,相应的 Function 实例 才会被启用:
dwc2_hsotg_complete_setup() → dwc2_hsotg_process_control() → hsotg->driver->setup() → configfs_composite_setup() → composite_setup() → set_config() → f->set_alt() → acm_set_alt():

static int acm_set_alt(struct usb_function *f, unsigned intf, unsigned alt)
{
    struct f_acm            *acm = func_to_acm(f);
    struct usb_composite_dev *cdev = f->config->cdev;

    /* we know alt == 0, so this is an activation or a reset */

    /* (1) 使能 endpoint,并且提交 `struct usb_request` 请求  */
    if (intf == acm->ctrl_id) {
        if (acm->notify->enabled) {
            dev_vdbg(&cdev->gadget->dev,
                    "reset acm control interface %d\n", intf);
            usb_ep_disable(acm->notify);
        }

        if (!acm->notify->desc)
            if (config_ep_by_speed(cdev->gadget, f, acm->notify))
                return -EINVAL;

        usb_ep_enable(acm->notify);

    } else if (intf == acm->data_id) {
        if (acm->notify->enabled) {
            dev_dbg(&cdev->gadget->dev,
                "reset acm ttyGS%d\n", acm->port_num);
            gserial_disconnect(&acm->port);
        }
        if (!acm->port.in->desc || !acm->port.out->desc) {
            dev_dbg(&cdev->gadget->dev,
                "activate acm ttyGS%d\n", acm->port_num);
            if (config_ep_by_speed(cdev->gadget, f,
                        acm->port.in) ||
                config_ep_by_speed(cdev->gadget, f,
                        acm->port.out)) {
                acm->port.in->desc = NULL;
                acm->port.out->desc = NULL;
                return -EINVAL;
            }
        }
        gserial_connect(&acm->port, acm->port_num);

    } else
        return -EINVAL;

    return 0;
}
6.2.4. Gadget Driver (Legacy)
对于 Legacy Gadget Driver 驱动来说,相当于 Configfs Gadget Driver 的一个简化版。
6.2.4.1. Gadget Drive
Legacy 风格的 gadget driver 的定义:
drivers\usb\gadget\composite.c:

static const struct usb_gadget_driver composite_driver_template = {
    .bind           = composite_bind,
    .unbind         = composite_unbind,

    .setup          = composite_setup,
    .reset          = composite_disconnect,
    .disconnect     = composite_disconnect,

    .suspend        = composite_suspend,
    .resume         = composite_resume,

    .driver = {
        .owner              = THIS_MODULE,
    },
};
驱动提供了一个注册函数 usb_composite_probe(),以供 composite device 来进行调用:
int usb_composite_probe(struct usb_composite_driver *driver)
{
    struct usb_gadget_driver *gadget_driver;

    if (!driver || !driver->dev || !driver->bind)
        return -EINVAL;

    if (!driver->name)
        driver->name = "composite";

    /* (1) 把传递过来的 `usb_composite_driver` 包装成 `usb_gadget_driver` */
    driver->gadget_driver = composite_driver_template;
    gadget_driver = &driver->gadget_driver;

    gadget_driver->function =  (char *) driver->name;
    gadget_driver->driver.name = driver->name;
    gadget_driver->max_speed = driver->max_speed;

    /* (2) 注册 gadget driver,让其和 gadget device 适配 */
    return usb_gadget_probe_driver(gadget_driver);
}
EXPORT_SYMBOL_GPL(usb_composite_probe);
6.2.4.2. Composite Device
没有了 configfs 由用户来创建 composite device ,只能使用一个文件来创建 composite device 定义其使用哪些 function 和一系列配置。例如:
drivers\usb\gadget\legacy\acm_ms.c

static struct usb_composite_driver acm_ms_driver = {
    .name           = "g_acm_ms",
    .dev            = &device_desc,
    .max_speed      = USB_SPEED_SUPER,
    .strings        = dev_strings,
    .bind           = acm_ms_bind,
    .unbind         = acm_ms_unbind,
};

/* (1) 驱动一开始就调用 usb_composite_probe() 来注册 acm_ms_driver
        因为 acm_ms_driver 没有指定 udc_name 所以只能适配第一个 udc
*/
module_usb_composite_driver(acm_ms_driver);

#define module_usb_composite_driver(__usb_composite_driver) \
    module_driver(__usb_composite_driver, usb_composite_probe, \
            usb_composite_unregister)
在 gadget driver 驱动适配后,调用 bind() 函数:
usb_gadget_probe_driver() → udc_bind_to_driver() → composite_bind() → acm_ms_bind()
在 acm_ms_bind() 函数中创建 composite device 的 Configuration 和 Function/Interface ,并且和 Gadget Device / UDC 进行绑定。
其他操作和 Configfs Gadget Driver 类似。
6.3. USB Interface Layer
Linux 使用 Function 来实现 USB Interface 等级的功能。
6.3.1. Function 注册
在 drivers/usb/gadget/function/ 路径下有一批 Gadget Function 的定义:
$ ls drivers/usb/gadget/function/f*
f_acm.c  f_ecm.c  f_eem.c  f_fs.c  f_hid.c  f_loopback.c  f_mass_storage.c  f_mass_storage.h
f_midi.c  f_ncm.c  f_obex.c  f_phonet.c  f_printer.c  f_rndis.c  f_serial.c  f_sourcesink.c
f_subset.c  f_tcm.c  f_uac1.c  f_uac1_legacy.c  f_uac2.c  f_uvc.c  f_uvc.h
大家使用 DECLARE_USB_FUNCTION_INIT() 宏定义来调用 usb_function_register() 函数,把 usb_function_driver 注册到全局链表 func_list 中。等待 composite device 来进行实例化。
DECLARE_USB_FUNCTION_INIT(acm, acm_alloc_instance, acm_alloc_func);

#define DECLARE_USB_FUNCTION(_name, _inst_alloc, _func_alloc)               \
    static struct usb_function_driver _name ## usb_func = {         \
        .name = __stringify(_name),                         \
        .mod  = THIS_MODULE,                                        \
        .alloc_inst = _inst_alloc,                          \
        .alloc_func = _func_alloc,                          \
    };                                                              \
    MODULE_ALIAS("usbfunc:"__stringify(_name));

#define DECLARE_USB_FUNCTION_INIT(_name, _inst_alloc, _func_alloc)  \
    DECLARE_USB_FUNCTION(_name, _inst_alloc, _func_alloc)           \
    static int __init _name ## mod_init(void)                       \
    {                                                               \
        return usb_function_register(&_name ## usb_func);   \
    }                                                               \
    static void __exit _name ## mod_exit(void)                      \
    {                                                               \
        usb_function_unregister(&_name ## usb_func);                \
    }                                                               \
    module_init(_name ## mod_init);                                 \
    module_exit(_name ## mod_exit)
6.3.2. Gadget API
在 Function Layer 主要使用以下 Gadget Layer 层提供的 API:
usb_ep_autoconfig()
usb_ep_enable()
usb_ep_disable()
usb_ep_alloc_request()
usb_ep_free_request()
usb_ep_queue()
usb_ep_dequeue()
7. 常见问题
7.1. 自动切换 Host/Device
该功能是在用户态手动切换 USB 端口为 Host 或者 Device
7.1.1. 配置修改
在 相应工程的 board.dts 中打开 otg 的宏,并配置 otg-mode, 可选值为
- auto: 通过硬件的 ID 管脚切换
- host: 默认配置为 host
- device: 默认配置为 device
#if 1
&otg {
       otg-mode = "device";    /* auto/host/device */
       status = "okay";
};
7.1.2. 手动切换
通过上述配置打开 otg mode 后就可以在控制台通过 sysfs 的接口进行手动切换
[aic@] #cat /sys/devices/platform/soc/soc\:usb-otg/otg_mode                 //当前模式
[aic@] #echo auto > /sys/devices/platform/soc/soc\:usb-otg/otg_mode         //切换为 auto
[aic@] #echo device > /sys/devices/platform/soc/soc\:usb-otg/otg_mode       //切换为 device
[aic@] #echo host > /sys/devices/platform/soc/soc\:usb-otg/otg_mode         //切换为 host